Introduction
Here’s the truth that most people don’t believe until they’ve done it: brewing beer at home is genuinely easier than you think. You don’t need a chemistry degree. You don’t need a warehouse full of shiny equipment. With some basic gear and a handful of ingredients, you can create beer that tastes fresher—and often better—than most of what you’ll grab off a store shelf.
Why? Because you’re the one calling the shots on sanitation, fermentation temperature, and timing. Those three things make an enormous difference, and once you control them, you’ll never look at a six-pack the same way again.
This guide is designed to walk you through your very first batch with confidence, not anxiety. We’re going to focus on extract brewing, which is the most beginner-friendly path into the hobby. But don’t think of extract as “training wheels”—think of it as the fast lane to understanding how beer actually works. The principles you learn here carry forward into every batch you’ll ever make, no matter how advanced you get.
Timeline overview (so you can relax)
Before we dive in, let’s talk about how long this whole adventure actually takes, because the timeline is probably the biggest source of unnecessary stress for new brewers. Brew day itself takes about 3 to 4 hours—that’s the hands-on, active part where you’re stirring pots and feeling like a mad scientist. Then fermentation takes over, and that’s 1 to 2 weeks of doing absolutely nothing while yeast does all the heavy lifting. After that comes bottling day, which clocks in at roughly 2 hours. Then you wait another 2 weeks or so for carbonation and conditioning. All told, you’re looking at about 4 to 6 weeks from grain to glass.
On paper, that sounds slow. In practice, though, it’s really just a few short work sessions separated by stretches of waiting—and that waiting is where the magic happens. The beer literally gets better while you’re off living your life. Not a bad deal, right?
Why homebrew?
So why would anyone bother brewing their own beer when the store is right there? The practical reasons are solid: you save money over time, you get complete creative control over your recipes, and there’s a deep, almost primal satisfaction in drinking something you made with your own hands. But honestly? The deeper reason people stick with homebrewing goes beyond all of that. Homebrewing teaches you how beer works. Once you understand what yeast actually does, why fermentation temperature matters so much, and how oxygen can be your best friend or worst enemy depending on the timing, you start tasting commercial beer through an entirely different lens. You’ll sip a craft IPA and think, “Oh, they dry-hopped this aggressively,” or “This fermented a little warm.” It rewires your palate in the best possible way.
It’s also worth mentioning that homebrewing has one of the most generous, welcoming communities of any hobby out there. Most brewers absolutely love helping beginners succeed. Walk into a homebrew shop or post a question on a forum, and you’ll be drowning in friendly advice within minutes. You’re not just picking up a hobby—you’re joining a tribe.
Brewing methods: choose your path
There are three common approaches to homebrewing, and you can absolutely work your way through all of them over time. But for batch number one, simplicity wins every time.
Extract brewing (start here)
Extract brewing is the perfect starting point because it sidesteps the most complex part of the process—the mash—by using pre-made concentrated wort, also known as malt extract. This doesn’t mean you’re cutting corners or making lesser beer. You’re still making real decisions about hops, managing your own fermentation, and learning all the fundamentals that matter. Extract brewing is best for your first 5 to 10 batches because it gives you fewer moving parts and remarkably consistent results. It lets you focus on technique and sanitation without getting overwhelmed.
Partial mash
Once you’ve got a few extract batches under your belt and you’re craving more control over flavor and body, partial mash is the natural next step. This method combines malt extract with a small mash or steep of specialty grains, giving you a wider palette of flavors to play with without the full complexity of going all-grain. Think of it as the middle ground where things start getting really creative.
All-grain
All-grain brewing is the full-control experience. You’re converting starch to sugar yourself, managing every single variable from mash temperature to water chemistry. It’s incredibly rewarding, but it also adds time, equipment, and a learning curve. It’s best saved for after you’ve brewed enough batches to know exactly what you want to control and why. And here’s something important to remember: none of these methods is “more real” than the others. They’re simply different levels of control and complexity, and great beer comes from all three.
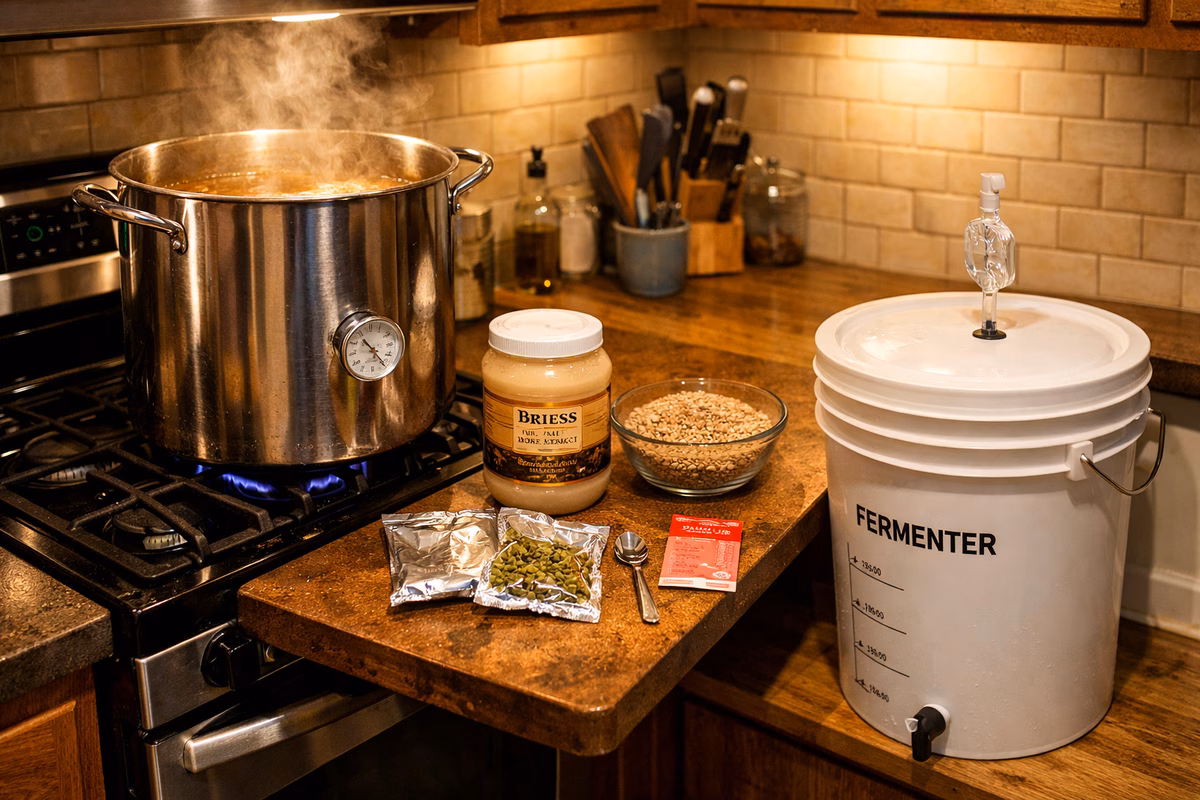
Essential equipment (the real minimum)
Here’s the good news: you can brew with surprisingly little equipment. The key principle is that everything needs to be cleanable, and anything that touches your beer after it’s been cooled must be sanitizable. That’s really the golden rule of homebrewing gear.
Your core setup needs just a handful of items. A good thermometer is genuinely helpful for hitting the right temperatures throughout the process. Sanitizer is absolutely critical—this is the one thing you cannot skip or skimp on. You’ll need a fermenter, which can be either a food-grade bucket or a glass carboy, fitted with an airlock to let CO2 escape while keeping nasties out. Tubing for siphoning beer from one vessel to another is essential, and a hydrometer or refractometer lets you confirm that fermentation is actually happening (and finishing). Round it out with a long spoon or spatula for stirring, and you’ve got everything you need to brew.
If you’re planning to bottle—which most beginners do for their first batch—you’ll also want a collection of bottles (recycled pry-off bottles or swing-top bottles both work great), a capper with fresh caps, and ideally a bottling bucket with a spigot, which makes the filling process much smoother and less messy.
Many homebrew shops sell complete starter kits for $80-150. These include the basics plus your first recipe ingredients, which reduces decision fatigue.
If you plan to stick with the hobby, you can upgrade later (including switching to kegging). For your first batch, the goal is simple: brew clean beer.
Ingredients: the four essentials
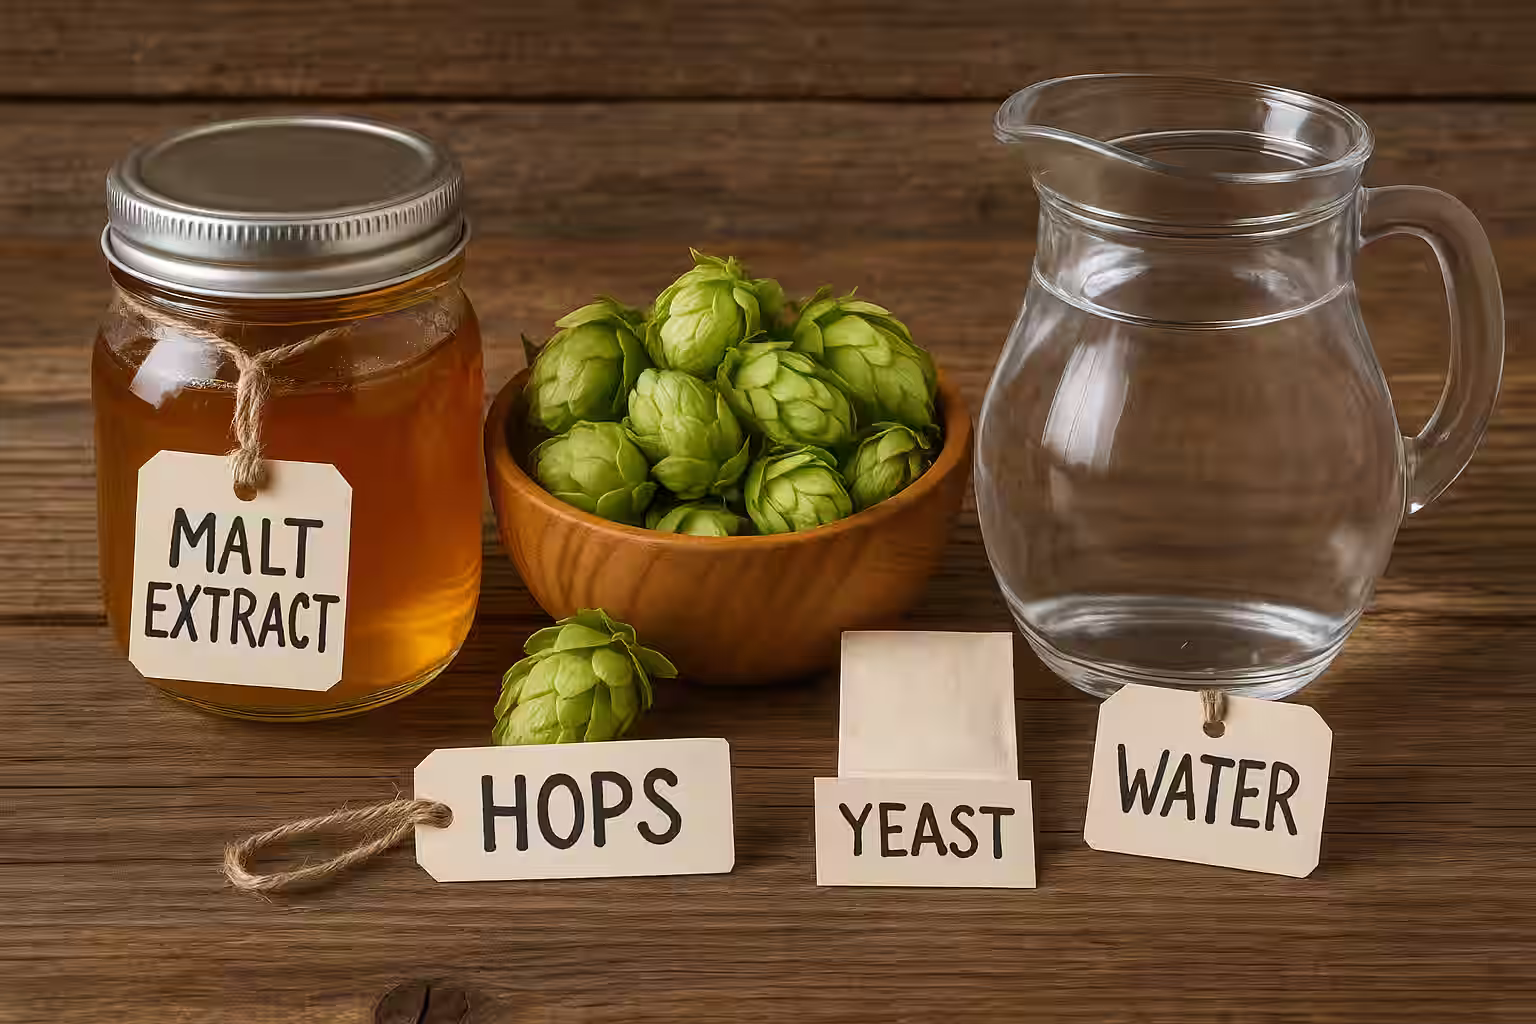
Beer is water, malt, hops, and yeast. That’s it. Everything else—every style, every flavor profile, every experimental brew you’ve ever tasted—is just variation on those four ingredients. Let’s break them down.
1) Water
Water is the most abundant ingredient in your beer, so it matters more than most beginners realize. For a typical 5-gallon batch, you’ll use about 6 to 7 gallons total across the day (some is lost to evaporation during the boil and absorption by grains and hops).
Here’s the simple rule: if your tap water tastes good to drink, it can make great beer. If it smells like chlorine or has a funky taste, reach for filtered water instead. Chlorine and chloramine—the chemicals cities use to treat water—can create harsh, plastic-like off-flavors that’ll ruin an otherwise perfect brew. For batch number one, filtered tap water is usually the sweet spot. Don’t overthink water chemistry at this stage; that rabbit hole goes deep, and it can wait.
2) Malt extract (the sugar source)
Malt extract is what gives your beer its fermentable sugars—the food that yeast will convert into alcohol and CO2. It comes in two forms, and both work beautifully. Liquid malt extract (LME) is a thick, syrupy liquid that’s easy to work with but can darken with age, so buy it fresh. Dry malt extract (DME) is a fine powder with a longer shelf life that’s easier to measure precisely. Many recipes call for one or the other, and some use both.
Even when you’re doing extract brewing, you can add tremendous complexity to your beer by steeping specialty grains like tea. Crystal malts will add luscious caramel sweetness, while roasted malts bring in those dark, rich coffee and chocolate notes. This is where your beer starts developing a personality all its own.
3) Hops
Hops are the spice rack of the beer world. They provide bitterness to balance the sweetness of the malt, and they contribute flavor and aroma that can range from piney and resinous to tropical and citrusy.
The key to understanding hops is thinking about them on a timeline during the boil. Hops added early in the boil (say, at the 60-minute mark) contribute mostly bitterness because the long boil extracts and isomerizes their alpha acids. Hops added in the middle of the boil lean more toward flavor. And hops thrown in during the last few minutes contribute primarily aroma, because those delicate volatile oils don’t have time to boil away. For beginners, hop pellets are the way to go—they’re easy to measure, easy to store (keep them cold and sealed), and they work consistently well.
4) Yeast
Here’s something that might surprise you: yeast is not just “the thing that makes alcohol.” It is, hands down, the single most important flavor engine in your beer. The same wort fermented with two different yeast strains will produce two completely different beers. Yeast creates esters, phenols, and a whole universe of flavor compounds that define whether your beer tastes clean and crisp, fruity and complex, or spicy and funky.
For your first batch, reach for dry ale yeast—something like Safale US-05. It’s shelf-stable, incredibly reliable, tolerant of minor temperature swings, and produces a clean, neutral flavor profile that lets the malt and hops shine. You can get adventurous with liquid yeast strains later, but for now, dry yeast is your best friend.
The brewing process (the part that feels like magic)
Alright, this is the main event. The brewing process might look intimidating when you see it all written out, but I promise it’s really just a handful of straightforward phases. Think of it like cooking a big meal: there are a lot of steps, but none of them are individually difficult.
Before brew day: set yourself up to win
The single best thing you can do for a smooth brew day is prepare the night before. Read through your recipe once while you’re calm—not while water is already boiling and you’re frantically searching for your thermometer. Lay out all your equipment so you can see it and confirm nothing’s missing. And make sure you’ve blocked out 3 to 4 hours of uninterrupted time. Brewing while rushed is a recipe for mistakes, and this should be fun, not stressful.
Step 1: Clean, then sanitize
This is the step that separates good homebrew from bad homebrew, full stop. Cleaning and sanitizing are two different things, and you need both. Cleaning removes visible grime, residue, and gunk. Sanitizing reduces invisible microbes to safe levels. Think of it this way: “clean” is what you can see, “sanitary” is what you can’t.
Everything that touches your beer after it has been cooled to pitching temperature must be sanitized. That means your fermenter, lid or stopper, airlock, siphon tubing, spoon, and hydrometer jar all get the full treatment. A no-rinse sanitizer like Star San makes this almost effortless—mix it up, let everything soak for a couple minutes, and you’re golden.
The #1 cause of bad homebrew is poor sanitation. Everything touching cooled wort must be sanitized.
“Clean” is not “sanitized.” Clean is what you can see. Sanitary is what you can’t.
Step 2: Steep specialty grains (optional, but recommended)
If your recipe includes specialty grains—and most good ones do—this is where things start getting aromatic and exciting. You’re essentially making beer tea. Heat up 2 to 3 gallons of water, then hold the temperature around 150 to 160°F while your crushed grains steep in a muslin bag for 20 to 30 minutes. When the time is up, pull the bag out and let it drain naturally. Resist the urge to squeeze it hard, as that can extract harsh tannins you don’t want.
This seemingly simple step is where a surprising amount of color and “real beer” flavor come from, even in extract batches. It’s the difference between a beer that tastes homemade and one that tastes like it could’ve come from a craft brewery.
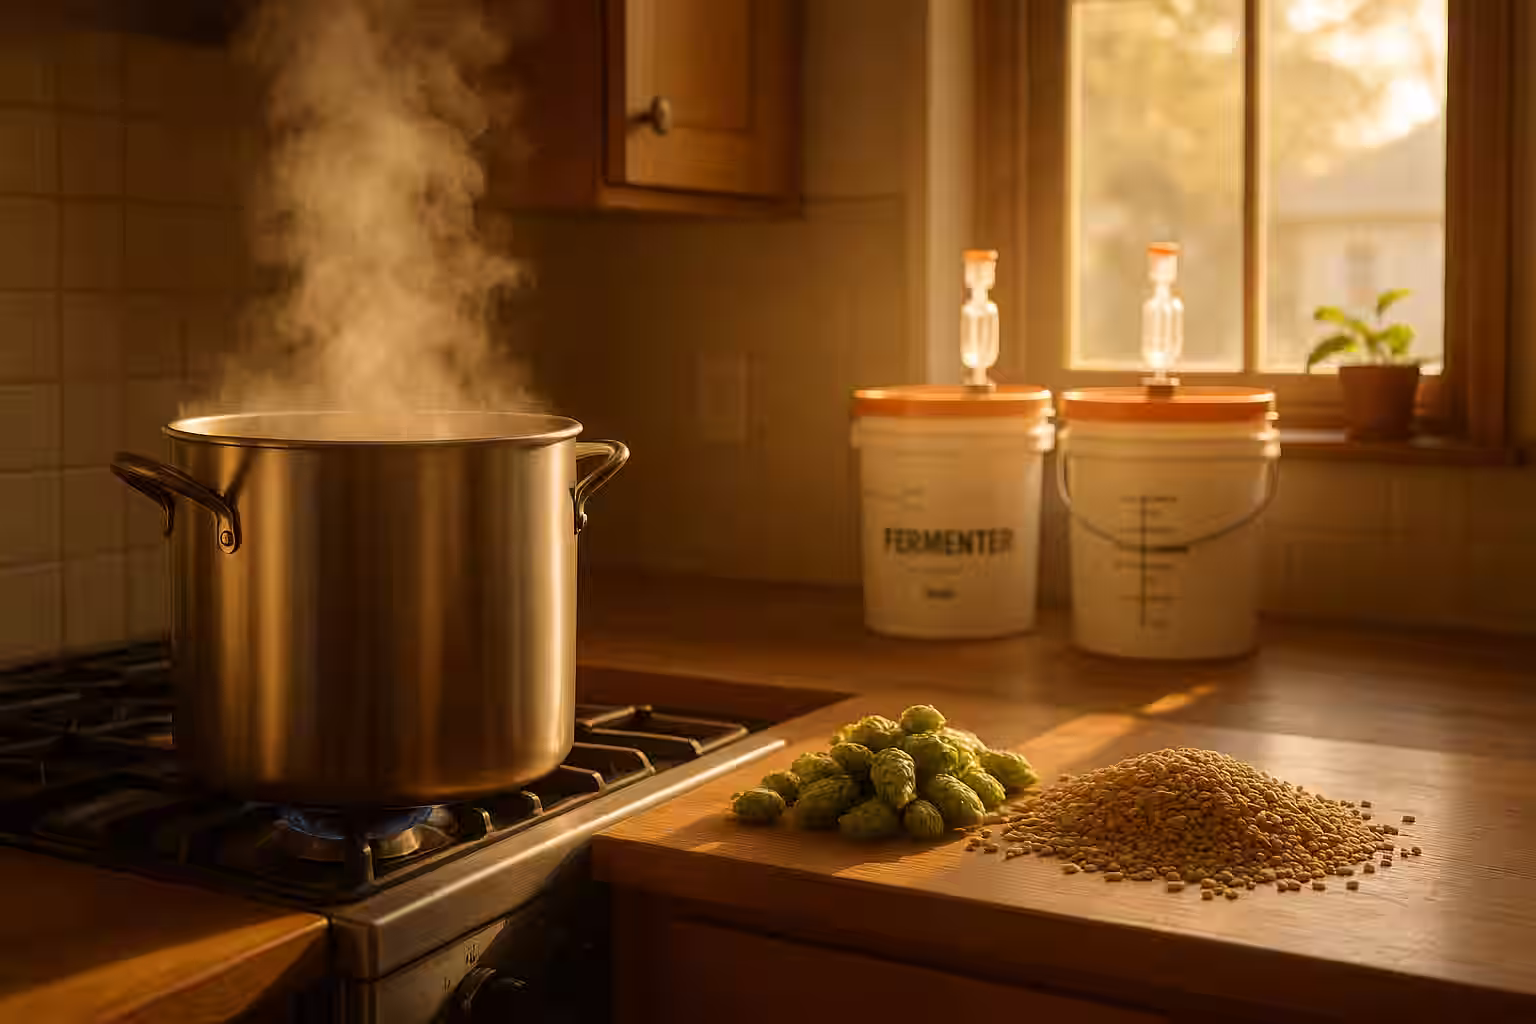
Step 3: Boil and hop additions
Now we’re cooking—literally. Bring the wort to a boil, but before you add your malt extract, turn off the heat first. This prevents the extract from scorching on the bottom of the pot, which would give your beer an unpleasant burnt flavor. Stir it in thoroughly, then crank the heat back up and return to a steady, rolling boil.
Your job during the boil is pretty straightforward: watch for boil-overs (they happen fast and they’re messy, so keep a spray bottle of cold water handy), add your hops on schedule according to the recipe, and maintain a steady boil without letting it turn into a volcanic eruption. This is actually a great time to clean up your steeping gear and prep your sanitizer solution for the next phase.
Step 4: Cool the wort
Once the boil is done, you need to cool your wort down as quickly as possible. Fast cooling reduces the risk of infection during the vulnerable window before yeast takes over, and it also helps with beer clarity by encouraging proteins to drop out of suspension.
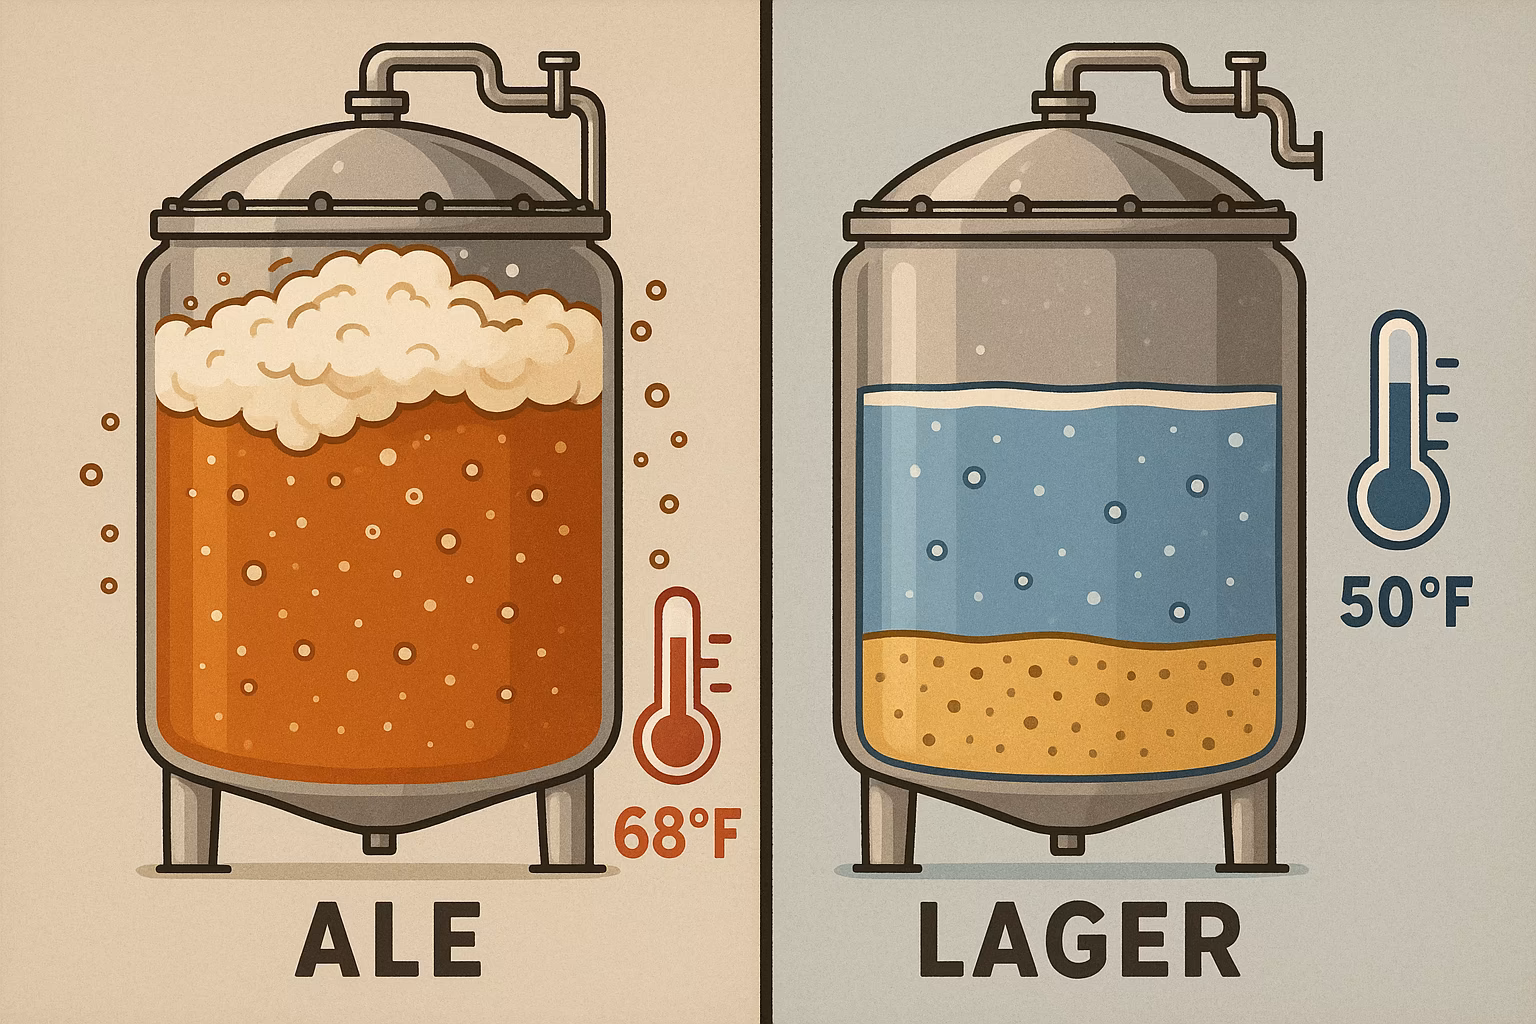
You’ve got two main options here. An ice bath—setting your brew pot in a sink or tub filled with ice water—is the budget-friendly approach. It works, but it’s slow, sometimes taking 30 to 45 minutes. An immersion wort chiller, which is a coil of copper tubing you run cold water through, is significantly faster and absolutely worth the investment if you decide to keep brewing. Either way, the goal is to get down to pitching temperature for your yeast. For most ale yeasts, the mid-60s °F is the sweet spot where they’re happiest and most productive.
Step 5: Transfer, top up, and measure OG
Here’s a fun twist: this is the one time in the entire brewing process where splashing is actually encouraged. Transfer your cooled wort into your sanitized fermenter, and go ahead and let it splash around. You’re aerating the wort, dissolving oxygen into the liquid, and yeast needs that oxygen to reproduce and build a healthy colony before it gets down to the business of making alcohol.
Top up with filtered water to reach your target volume (usually 5 gallons), give it a good stir, then take an Original Gravity (OG) reading with your hydrometer. OG tells you how much sugar is dissolved in your wort, which is your starting point for estimating the final alcohol content. Write this number down—you’ll compare it to the Final Gravity reading later to calculate your ABV.
Step 6: Pitch yeast and ferment
This is the moment of truth. Once your wort is at the right temperature, it’s time to pitch the yeast. With dry yeast, you can usually just sprinkle it right on top of the wort, though rehydrating it in a small amount of warm water first can improve its performance. Give it a gentle stir, seal up your fermenter, fill the airlock with sanitizer solution, and step back.
Fermentation is where beer becomes beer, and it’s honestly the most magical part of the whole process. Within 12 to 48 hours, you should see signs of activity—a layer of foamy krausen on top, bubbles percolating through the airlock, maybe even some gurgling sounds. It’s alive, and it’s working.
Your job during fermentation is beautifully simple: keep the temperature steady, resist the overwhelming urge to open the fermenter and “check on things” (every time you open it, you risk introducing contaminants), and just wait. Patience is the secret ingredient that separates good homebrewers from great ones.
Fermentation temperature is crucial. Too warm can create harsh off-flavors. Too cold can stall fermentation.
Aim around 65-70°F for many ale yeasts unless the yeast manufacturer suggests otherwise.
How do you know when fermentation is actually complete? Not by watching the airlock—that’s a common beginner mistake. Airlock bubbling is not a reliable indicator because CO2 can escape through imperfect seals, or temperature changes can push gas through the airlock without any fermentation happening. Instead, take gravity readings. When the gravity is stable over a couple of days, your beer is done fermenting and ready for packaging.
Step 7: Package (bottling)
Bottling day is essentially controlled sugar dosing. You’re adding a precise amount of sugar to your finished beer so the residual yeast can carbonate it naturally inside the sealed bottles. Start by sanitizing everything—bottles, caps, siphon tubing, bottling bucket, the works. Then dissolve your priming sugar (commonly about 5 ounces of corn sugar for a 5-gallon batch, though the exact amount depends on your carbonation target and beer style) in a small amount of boiling water and let it cool.
Gently transfer your beer onto the priming solution in the bottling bucket, taking care not to splash or introduce oxygen at this stage—unlike during transfer to the fermenter, oxygen is now your enemy. Give it a gentle stir to distribute the sugar evenly, then fill your bottles and cap them. Store the bottles at room temperature for about two weeks, and the yeast will do its thing one final time, creating the carbonation that turns flat beer into the fizzy, refreshing beverage you’ve been dreaming about.
Step 8: Pour and taste
This is the moment you’ve been waiting for. Grab a bottle from your stash, chill it in the fridge, and pour carefully into a glass, leaving the thin layer of yeast sediment behind in the bottle. Hold the glass up to the light, admire what you’ve made, take a deep sniff, and taste.
And then—this part is crucial—take notes. Seriously. Write down what the fermentation temperature was, how long each phase took, what you loved about the beer, and what you’d tweak next time. Brewing improves fast when you keep even simple records, and that notebook will become one of your most valuable brewing tools over time.
Your First Recipe: Simple Pale Ale
Perfect beginner beer - forgiving and delicious
Ingredients (5-gallon batch)
This recipe is a classic American Pale Ale that’s wonderfully forgiving for first-timers while still producing a beer you’ll be genuinely proud of. For your fermentables, you’ll need 6 pounds of Light Liquid Malt Extract (LME) as your base, along with 1 pound of Crystal 40L malt (crushed specialty grain) for a touch of caramel sweetness and body.
For hops, you’re going all-Cascade, which keeps things simple while producing that iconic American citrusy, floral character. You’ll use three separate 1-ounce additions: one at the start of the boil for bittering (60 minutes), one with 15 minutes left for flavor, and one at the 5-minute mark for aroma.
Your yeast is a single packet of Safale US-05, the American Ale dry yeast that’s practically bulletproof for beginners. And for bottling, you’ll need 5 ounces of corn sugar for priming.
Vital Statistics
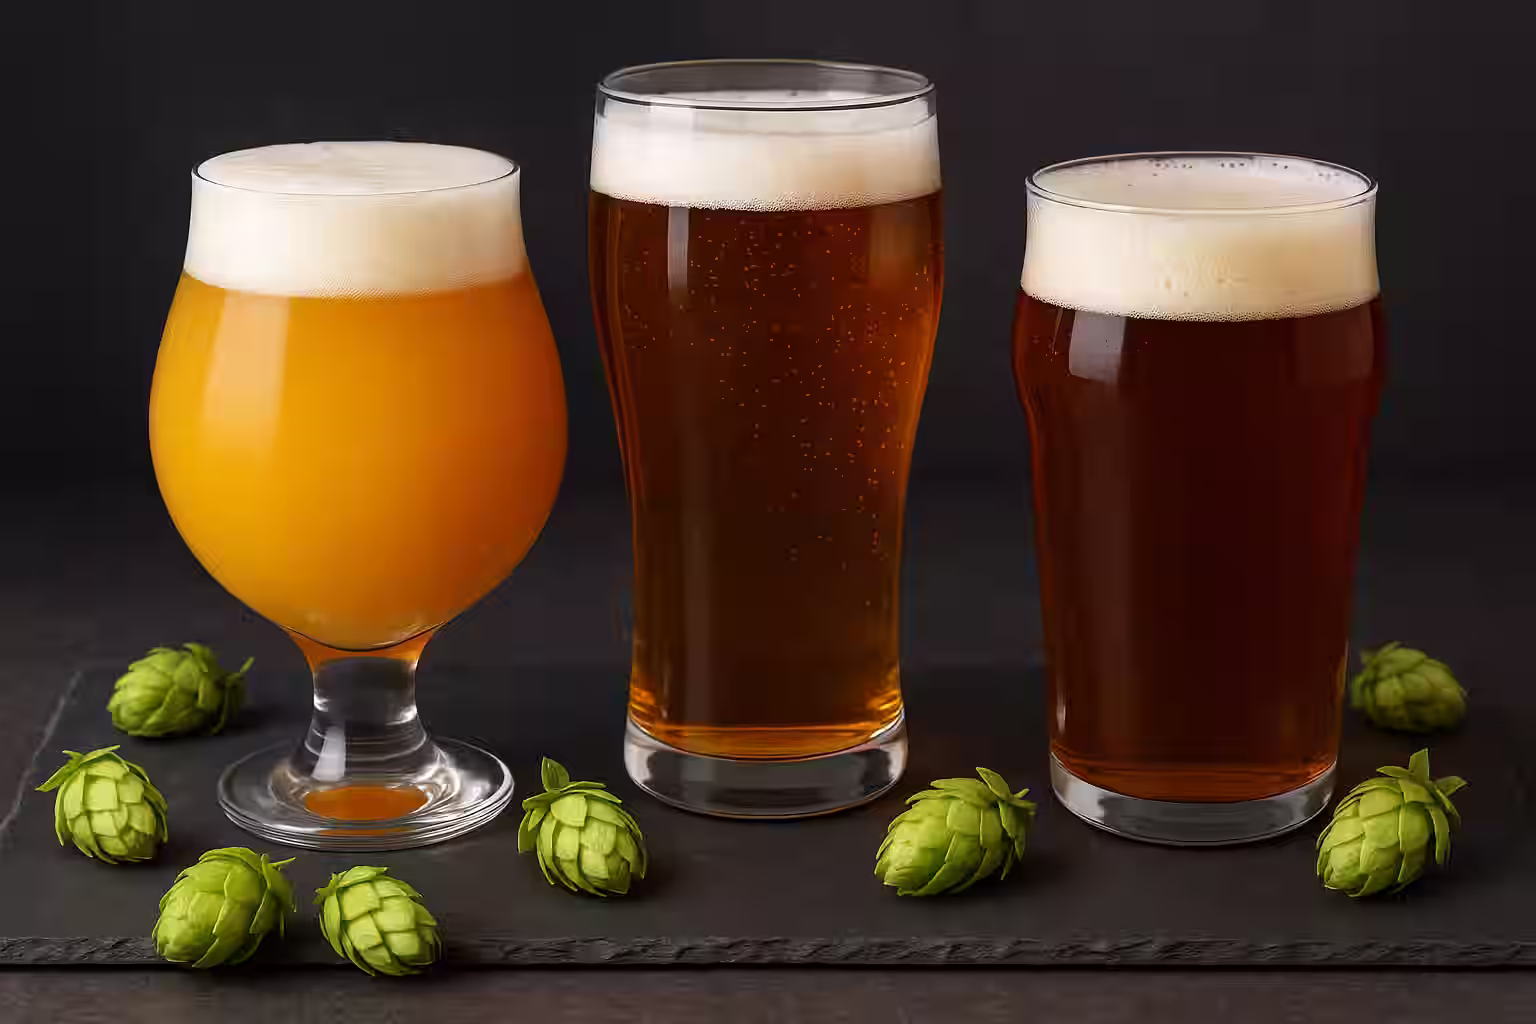
This recipe should give you an Original Gravity (OG) in the range of 1.048 to 1.052 and a Final Gravity (FG) of 1.010 to 1.014, landing you right around 5% ABV—a perfectly sessionable strength. The bitterness comes in at approximately 35 IBUs, which provides a nice balance without being overwhelming, and the color will range from a gorgeous gold to a warm amber depending on your exact process.
Brew Day Instructions
Here’s your step-by-step game plan for brew day. Start by steeping your Crystal malt in about 2.5 gallons of water, holding the temperature between 150 and 160°F for 30 minutes. Remove the grain bag and bring the liquid to a boil. Take the pot off the heat, add all your LME, and stir it in thoroughly so nothing settles and scorches on the bottom. Return the pot to the heat and bring it back to a boil, then start your 60-minute countdown. At 60 minutes remaining, add your first ounce of Cascade. At 15 minutes, add the second ounce. At 5 minutes, add the third ounce for that burst of aroma. When the boil is complete, cool the wort down to 65 to 70°F as quickly as you can, then transfer it into your sanitized fermenter and top up with filtered water to reach 5 gallons. Take your OG reading, pitch your yeast once the temperature is in that 65 to 70°F range, and then let fermentation work its magic for 1 to 2 weeks at 65 to 68°F. Bottle with your priming sugar, condition for 2 weeks at room temperature, and then crack one open and enjoy the fruits of your labor.
Common Problems & Solutions
Every brewer—even the pros—runs into problems. The good news is that most homebrew issues have simple explanations and straightforward fixes. Let’s walk through the most common ones so you’re prepared.
Problem: Airlock Not Bubbling
This is probably the number one source of panic for new brewers, and the good news is that it’s almost never as bad as you think. The most common culprit is simply a loose lid or stopper—if CO2 can escape around the seal, it won’t bother pushing through the airlock. Sometimes fermentation is so vigorous that it blows off through any available gap before the airlock can register it. And occasionally, fermentation has simply already finished faster than you expected.
The fix is easy: check your seal and reseat the lid. Look for krausen (that foamy layer on top of the beer)—if it’s there, fermentation is happening regardless of what the airlock says. If you’re still worried, take a gravity reading after a week to confirm that sugars are being consumed.
Problem: Off-Flavors
Off-flavors are your beer’s way of telling you something went sideways, and learning to identify them is actually one of the most valuable skills you’ll develop as a brewer. A buttery or butterscotch taste (called diacetyl) usually means fermentation was too cold or the beer was pulled off the yeast too quickly—the fix is to ferment a bit warmer and give the yeast more time to clean up after itself. Cidery or solvent-like flavors point to fermentation that ran too hot, so better temperature control in the 65 to 70°F range will solve that.
If your beer tastes sour or vinegary, you’re dealing with an infection, most likely acetobacter, which means sanitation needs to be tightened up and you should avoid exposing the beer to oxygen after fermentation begins. A skunky smell means light got to your beer—store it in the dark and always use brown bottles. Metallic flavors often come from old ingredients or poor water quality, so keep your ingredients fresh and consider filtering your water. And a cardboard or stale taste is the signature of oxidation, which means you need to minimize splashing after the boil is complete and drink your beer while it’s fresh.
Problem: Stuck Fermentation
Sometimes gravity just stops dropping before it reaches where it should be. This is usually caused by the fermentation temperature being too low (yeast slows down or goes dormant when it’s cold), not pitching enough yeast for the batch size, or not providing enough oxygen when you pitched. To fix it, try gently warming the fermenter to around 70°F, give it a careful swirl to rouse the yeast back into suspension, and above all, be patient. More often than not, patience is the only medicine a stuck fermentation actually needs.
Problem: Exploding Bottles
This one sounds scary—and it can be—but it’s entirely preventable. Bottle bombs happen when there’s too much priming sugar creating excess pressure, or when you bottled before fermentation was truly complete (leaving residual sugars that continue fermenting inside the sealed bottle). The prevention is simple: measure your priming sugar precisely using a scale (about 5 ounces for 5 gallons), always confirm that fermentation is finished before you bottle by checking that your Final Gravity is stable over 2 to 3 consecutive days.
Problem: Flat Beer
The opposite of exploding bottles is flat beer, which is disappointing but at least not dangerous. This usually means you didn’t add enough priming sugar, or your bottles are conditioning somewhere too cold for the yeast to carbonate. Make sure you’re using the correct amount of sugar for your batch size, store your bottles at 65 to 70°F for at least 2 weeks, and if they’re still flat, just wait longer—sometimes carbonation takes up to 4 weeks, especially in cooler conditions.
Homebrewing Tips for Success
After years of brewing and making every mistake in the book (so you don’t have to), here’s the distilled wisdom that will serve you best.
On the “definitely do this” side of things: sanitize obsessively, because you truly cannot overstate how important this is. Take detailed notes on every batch, recording temperatures, timings, ingredient sources, and your tasting impressions—this is how you improve faster than everyone else. Control your fermentation temperature as tightly as you can, because it’s the single biggest lever you have for beer quality. Be patient with every phase of the process, because rushing invariably ruins beer. Start simple and master extract brewing before you even think about going all-grain. And join a local homebrew club, because the people in those groups are incredibly helpful and will accelerate your learning enormously.
On the flip side, here’s what to avoid: never skip sanitizing, because a single infection can ruin months of work and waiting. Don’t open the fermenter during active fermentation just to peek—wait until it’s time for a gravity check. Never bottle before fermentation is fully complete, unless you enjoy the sound of exploding glass. Don’t stress about perfection, because your first batch will almost certainly be drinkable and probably better than you expect. Don’t ferment too warm, or you’ll get a parade of off-flavors. And most importantly, don’t give up—even a flawed batch teaches you something valuable for next time.
Next Steps
After Your First Batch
The best thing you can do after your first brew day is brew again immediately. Seriously—the repetition builds muscle memory and confidence faster than anything else. Once you’re comfortable with the process, start exploring different styles. An IPA will teach you about hop character, a stout will show you what roasted malts can do, and a wheat beer will introduce you to the wild world of yeast-driven flavors. When you’re feeling adventurous, experiment with additions like fruit, spices, coffee, or even oak chips. Joining a homebrew club is invaluable at this stage too, because competitions and peer feedback will accelerate your learning in ways that brewing alone simply can’t. And for the love of great beer, read more—“How to Brew” by John Palmer is the gold standard and it’s available free online.
Upgrade Path
After you’ve got 5 to 10 batches under your belt, you’ll start to feel the itch to level up your setup. A kegging system lets you skip the tedium of bottling forever and gives you draft beer on tap at home (it’s as amazing as it sounds). A dedicated fermentation chamber with temperature control—even just a mini-fridge with an external temperature controller—will dramatically improve your beer quality. Moving to partial mash brewing opens up a wider range of flavors, and eventually, all-grain brewing gives you total control over every aspect of your beer at a lower ingredient cost per batch.
Recommended Resources
If this guide has sparked your curiosity and you want to go deeper, here are the resources that the homebrewing community swears by. For books, “How to Brew” by John Palmer is the essential reference that every brewer should own (and it’s free to read online, so there’s no excuse). “The Complete Joy of Homebrewing” by Charlie Papazian is the classic that launched a million brewing careers, and “Brewing Classic Styles” by Jamil Zainasheff is an incredible recipe-driven guide that covers virtually every beer style.
Online, HomeBrewTalk.com has one of the most active and helpful brewing forums on the internet. Brewer’s Friend offers fantastic calculators and recipe tools that make planning your brew day a breeze. And the American Homebrewers Association (AHA) is the go-to organization for everything from competitions to advocacy.
For visual learners, YouTube channels like Homebrew Challenge, Northern Brewer, and BrewDog put out excellent video content that ranges from beginner tutorials to advanced techniques. And if you’re a podcast person, Experimental Brewing, Brew Files, and The Brewing Network will keep your ears full of brewing knowledge during your commute.
Practice & Play
Ready to test your knowledge?
- Take our Brewing Process Quiz
- Play the Ingredient Matching Game
- Read Advanced Brewing Techniques
- Explore Understanding Hops