Welcome to Better Coffee!
Time to Complete: 15 minutes What You’ll Learn: Coffee fundamentals to immediately improve your daily cup Who This Is For: Anyone drinking coffee who wants it to taste better
Part 1: The Four Pillars of Great Coffee (3 minutes)
1. Fresh Beans
Why It Matters: Coffee is agricultural product with peak freshness window.
The Rules:
- Buy whole beans with roast date (not “best by”)
- Use within 4-6 weeks of roast date
- Peak flavor: 7-21 days after roasting
- Store in airtight container, cool and dark
Where to Buy:
- Local specialty roaster (best—fresh, knowledgeable staff)
- Online specialty roasters (Blue Bottle, Counter Culture, etc.)
- Avoid: Grocery store (usually stale, months old)
2. Grind Fresh
Why It Matters: Ground coffee goes stale in hours (not days). Pre-ground coffee is dead coffee.
The Rules:
- Never buy pre-ground (loses flavor in 15-30 minutes)
- Grind just before brewing
- Use a burr grinder (blade “grinders” are terrible—uneven particles)
Investment:
- Minimum: $40-70 hand grinder (Timemore C2)
- Recommended: $140 electric burr grinder (Baratza Encore)
This is the #1 upgrade that transforms coffee quality.
Welcome to Better Coffee!
If your daily coffee is inconsistent—sometimes okay, often bitter, sometimes oddly sour—you don’t need a new personality or a barista apprenticeship. You need a repeatable process.
Time to complete: 15 minutes
In one pass through this guide, you’ll learn the few variables that actually control flavor, and you’ll get a concrete plan for making your next cup noticeably better.
Part 1: The Four Pillars of Great Coffee (3 minutes)
Coffee is an agricultural product that goes through a lot: it’s grown, processed, shipped, roasted, and finally brewed. Most “bad coffee” is simply coffee that’s stale, ground poorly, brewed with random ratios, or extracted at the wrong temperature. Fix those four things and you’re instantly ahead.
1) Fresh Beans
Freshness is the easiest win and also the most overlooked. Look for a roast date (not a “best by” date). Most coffees taste best in a window that starts after they’ve had a little time to rest and ends before they go flat.
As a practical beginner target: buy whole beans roasted recently, aim to drink them within about 4–6 weeks of roast date, and expect a peak often around 7–21 days after roasting.
Store beans in an airtight container in a cool, dark place. You’re trying to protect them from oxygen, heat, and light—those are the three main “staling accelerators.”
2) Grind Fresh (and Grind Evenly)
Grinding is where coffee gets fragile. Once coffee is ground, it has vastly more surface area and loses aroma fast. That’s why pre-ground can taste dull even if the beans started out decent.
Equally important: you want an even grind. Blade “grinders” smash beans into a mix of dust and boulders. Dust extracts too fast (bitter), boulders extract too slow (sour/weak). A burr grinder produces a much tighter particle distribution, which makes extraction more predictable.
If you only make one equipment upgrade, make it the grinder. A solid hand grinder can be a great budget choice; an entry electric burr grinder like the Baratza Encore is a common “buy once, use for years” recommendation.
3) Proper Ratio (Coffee + Water)
Most brewing problems are really ratio problems. Too much coffee relative to water often tastes harsh and bitter; too little tastes thin.
Start with a broad “golden zone” of 1:15 to 1:17 (coffee:water by weight). Here’s what that means in real cups:
- 20g coffee to 300g water
- 30g coffee to 500g water
Use a scale. It turns coffee from a vibe into a repeatable recipe.
4) Water Quality & Temperature
Coffee is mostly water, so water quality matters. Filtered tap or bottled spring water is usually a safe choice. Distilled water can brew oddly because it’s too “empty,” and heavily chlorinated water can make coffee taste flat.
For temperature, most coffee brews well in the 195–205°F (90–96°C) range. If you don’t have a temperature-controlled kettle, boil your water and wait about 30–60 seconds.
Part 2: Choose Your Brewing Method (5 minutes)
There are many ways to brew, but beginners do best when they pick one method and learn what “good” looks like. Here are the three practical starting options.
For Beginners: French Press
French press is forgiving, inexpensive, and produces a rich cup with body. It’s the easiest way to prove to yourself that fresh beans + a burr grinder + a scale changes everything.
Try this baseline recipe:
- Heat water, then let it cool briefly (target ~200°F).
- Grind 30g coffee coarse (breadcrumbs/coarse sea salt).
- Add coffee, then pour 500g water and stir.
- Steep 4 minutes.
- Press slowly and pour immediately.
Expect a full-bodied cup and a little sediment. If you prefer a cleaner cup, pour-over might be your style.
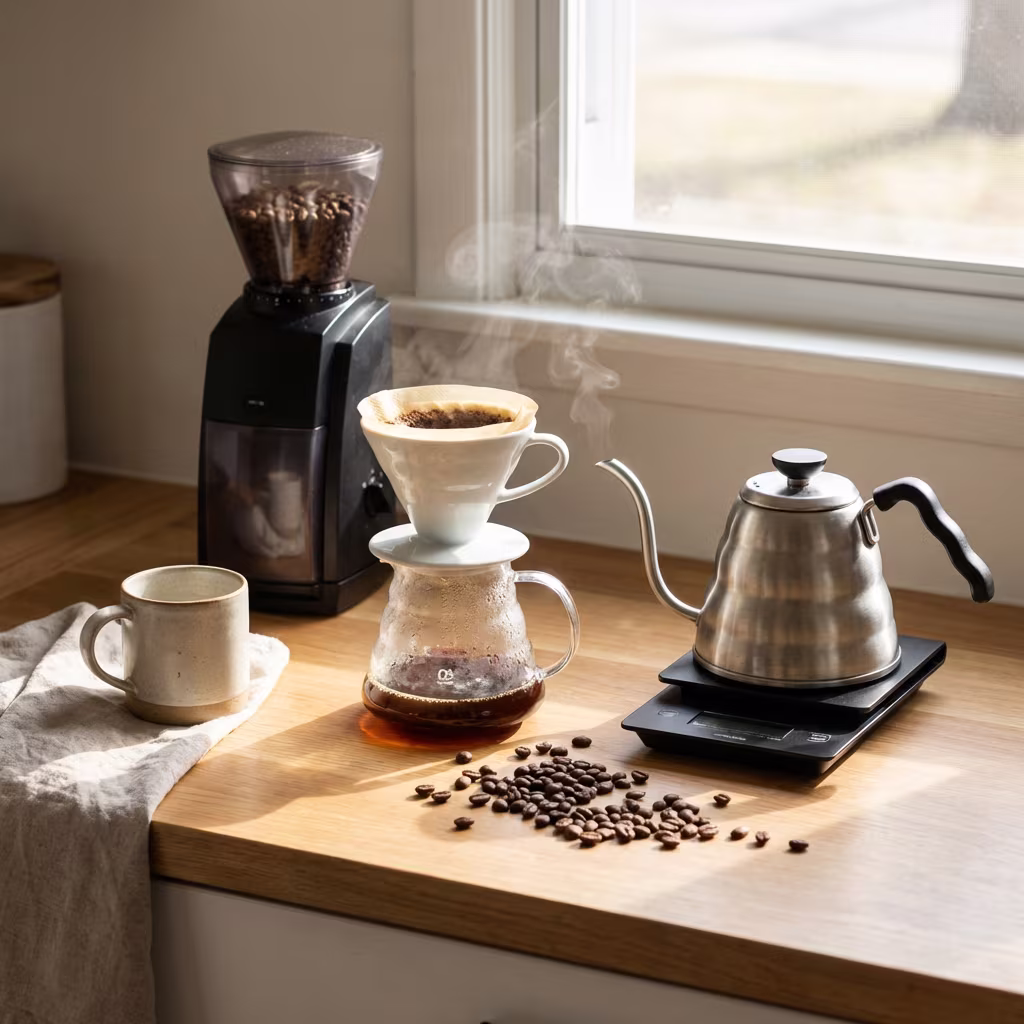
For Pour-Over Lovers: V60
V60 is the “clean and clear” option. It can highlight fruit, florals, and sweetness, but it rewards consistent pouring and grind.
Baseline V60 recipe:
- Heat water to ~205°F.
- Rinse the filter.
- Grind 20g coffee medium-fine (like sand).
- Bloom with ~40g water for 30–45 seconds.
- Pour up to 300g total, gently and steadily.
- Aim for a total brew time around 2:30–3:00.
If your coffee tastes sour, you’re often under-extracting (try a finer grind or slightly hotter water). If it tastes bitter, you’re often over-extracting (try coarser or slightly cooler).
For Convenience: Automatic Drip (but Buy the Right Kind)
Automatic drip can be excellent, but cheap machines frequently brew too cool or unevenly, which produces dull or bitter coffee. Look for a certified machine designed to hit proper brew temperatures and distribute water well.
If you want “set it and forget it,” a machine like the Bonavita Connoisseur or Technivorm Moccamaster is popular because it can consistently do the basics right.
Use a medium grind, start near a 1:17 ratio (about 60g coffee per 1L water), and serve the coffee soon after brewing. Leaving coffee on a hot plate for a long time will flatten and burn flavors.
For Espresso Fans: Start Later (or Be Prepared)
Espresso is wonderful—and it’s the hardest starting point. It demands a capable grinder, a stable machine, and a willingness to practice. If you’re brand new, it’s usually smarter to master filter coffee first so you develop a taste reference.
If you’re determined, read the Equipment Guide before buying anything. A serious “entry” setup is still a meaningful investment.
Part 3: Choosing Beans (4 minutes)
When you’re new, bean selection is less about chasing rare flavors and more about finding a baseline you actually like.
Roast Level: Start in the Middle
Light roasts often showcase fruit and acidity, but they can taste sharp if your brewing is inconsistent. Dark roasts can taste smoky or bitter, and they often hide defects rather than reveal origin character.
For most beginners, medium roast is the best starting point: it’s sweet, balanced, and forgiving across methods.
Origin: Pick a Direction
If you like bright, “interesting” cups, coffees from East Africa (Ethiopia, Kenya) often lean floral and citrusy. If you want reliable, crowd-pleasing flavor, Central and parts of South America (Colombia, Costa Rica, Brazil) often offer chocolate, caramel, and nutty notes.
If you want the simplest beginner move, start with a Colombian medium roast or a roaster’s house blend.
Single-Origin vs. Blend
Single-origin coffees can be amazing, but they can also be polarizing. Blends are designed for balance and consistency and are often a better “daily driver” while you learn how grind, ratio, and water change taste.
Start with blends, then explore single-origin once you can reliably brew a cup you recognize.
Part 4: Immediate Action Plan (3 minutes)
You don’t need to do everything at once. Do the minimum set of changes that make a visible difference.
This Week
Buy fresh whole beans (roast date visible). Choose a medium roast blend or a balanced origin.
Get a burr grinder (hand or electric). This is the upgrade that unlocks consistency.
Get a scale. A cheap kitchen scale is fine as long as it’s reliable.
Pick one brewing method and repeat it for a week. Consistency is how you learn.
Your First Brew (Tomorrow Morning)
Make one cup and taste it before adding milk or sugar. Even if you prefer coffee with additions, tasting it plain teaches you what to adjust.
Use this simple interpretation guide:
- Bitter/harsh: go coarser, reduce brew time, or lower temperature slightly
- Sour/too sharp: go finer, extend contact time slightly, or raise temperature
- Weak: increase coffee dose or reduce water
This Month
Once you can brew a decent baseline cup, expand in a controlled way: change one variable at a time, take a quick note, and repeat what works.
If you want a structured next step, read the Brewing Methods Guide and the Coffee Bean Origins. If you prefer tools, the Brew Ratio Calculator can help you scale recipes to any cup size.
Common Beginner Mistakes
Most coffee frustration is predictable. If you avoid these mistakes, you’ll save yourself months.
Stale beans are the biggest issue. The second is uneven grinding (blade grinders). After that, it’s eyeballing ratios, brewing at the wrong temperature, and letting equipment get dirty enough that old oils dominate flavor.
Also: don’t quit after a couple mediocre cups. Coffee is a skill, and you learn it quickly when you adjust one variable at a time.
Quick Troubleshooting
When a cup is “wrong,” don’t change everything. Use a small checklist:
- Bitter: coarser grind, cooler water, shorter brew
- Sour: finer grind, hotter water, longer brew
- Watery: more coffee or slightly finer grind
- Flat/empty: check freshness first, then water temperature
Budget Breakdown
The goal isn’t to buy gadgets. The goal is to buy the handful of things that protect the four pillars.
Starter kit (~$100–150): hand burr grinder + French press + basic scale + fresh beans.
Recommended kit (~$250–350): entry electric burr grinder + V60 + gooseneck kettle + scale + storage container.
Premium kit (~$500–700): higher-end grinder + temperature-controlled kettle + preferred brewers + accessories.
Next Steps
If you do nothing else today, do one of these: order fresh beans, price a burr grinder, or buy a scale. Once you can brew one method consistently, expand slowly and intentionally.
For structured learning, start with Brewing Methods Guide. For bean exploration, head to Coffee Bean Origins. For practical scaling, use the Brew Ratio Calculator.
The Bottom Line
Great coffee is not mysterious. It’s four controllable choices: fresh beans, an even grind, a real ratio, and water at the right temperature.
Start simple: fresh beans + burr grinder + scale + one method you repeat for a week. Your coffee will improve fast—and you’ll finally know why.
- Pour over enthusiast: V60 ($8-30) + gooseneck kettle ($40-60)