Complete Keyboard Modding Guide
Keyboard modding transforms a stock keyboard into a personalized, premium typing experience. This guide covers everything from beginner-friendly mods to advanced techniques.
Why Mod Your Keyboard?
Sound Improvement
Stock keyboards often sound pingy (spring noise), rattly (stabilizers), hollow (empty case resonance), or scratchy (unlubed switches). Modding is how you decide what you want instead: deeper and “thocky,” sharper and “clacky,” or simply calmer and more controlled. The goal isn’t a single ideal sound—it’s a sound that matches your taste and the room you type in.
Feel Improvement
Feel changes tend to be even more noticeable than sound. Stock switches can be scratchy or inconsistent, and spring ping or housing wobble can make a board feel cheaper than it is. Modding is how you get to “boring smooth”: consistent across keys, less wobble, less noise, and a bottom-out that feels intentional rather than chaotic.
Is Modding Necessary?
No. Stock keyboards can already be excellent, and modern prebuilts are far better than the hobby sometimes admits. Modding is for people chasing a specific sound or feel, for people who enjoy tinkering as much as typing, and for anyone who wants the keyboard itself to become part of the hobby rather than just a tool.
The returns also flatten quickly. First-pass mods like switch lubrication and stabilizer tuning usually produce most of the audible and tactile improvement. After that, films, foam, and more specialized tweaks can absolutely matter, but they tend to add refinement rather than transformation.
Modding Difficulty Tiers
Beginner (No Disassembly)
Beginner mods are the low-risk ones you can do without opening switches or getting delicate: adding case foam, using a desk mat to change desk resonance, swapping keycaps, or experimenting with switch pads if the board supports them.
Intermediate (Some Disassembly)
Intermediate mods usually start once the case opens. Stabilizer tuning, plate or PCB foam, and the common tape-mod family all live here because they are not conceptually hard, but they do require care and a willingness to take the keyboard apart.
Advanced (Switch Disassembly)
Advanced mods happen at the switch level: lubing, filming, spring swapping, and frankenswitching. This is where time investment jumps because every single switch becomes a small project.
Expert (Soldering/Permanent)
Expert mods are the ones that can become permanent or expensive mistakes: solder work, PCB changes, mounting experiments, and anything that meaningfully alters how the board is built rather than just how it is tuned.
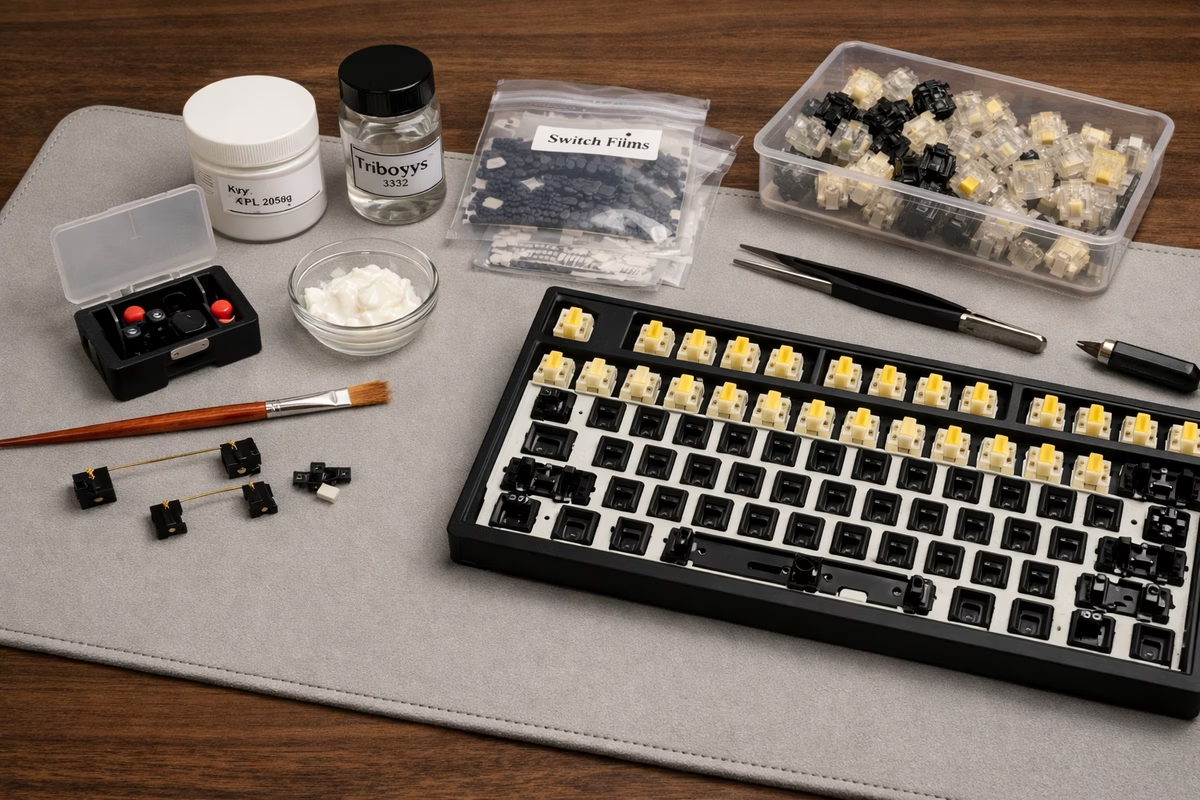
Essential Modding Tools
The best modding tool isn’t something you buy—it’s a workflow. Change one variable at a time, live with it for a day, then decide what to do next. If you lube switches, add foam, change keycaps, and tape mod in one night, you won’t know which change helped or hurt. Iteration turns “random internet mods” into a board you can explain and reproduce.
Basic Kit ($30-50)
For a basic kit, you mainly need a switch opener, a small brush, a keycap puller, a switch puller if the board is hot-swap, and tweezers. That is enough to work cleanly and avoid the classic “I improvised with a screwdriver and damaged something” mistake. On the lubricant side, Krytox 205g0 is the standard starting point for linears and stabilizers, while Tribosys 3203 is the safer choice for tactiles because it is less likely to flatten the bump.
Intermediate Kit ($70-100)
An intermediate kit adds the materials that shape sound rather than just smoothness: switch films, stabilizer pads, dielectric grease for wires, case foam or sorbothane, and simple tape for PCB-backed sound experiments. At this point you are not just fixing problems; you are starting to voice the board intentionally.
Advanced Kit ($150+)
An advanced kit adds replacement springs in different weights, premium films, more specialized stabilizer materials, PE foam, nicer tape-mod supplies, and precision drivers. This is the point where your tool drawer starts to look like evidence that keyboards are no longer a casual interest.
Switch Lubing (Advanced)
What Is Switch Lubing?
Applying lubricant to switch components to reduce friction and noise.
Time Investment:
- 70 switches: 2-4 hours (first time: 4-6 hours)
- 104 switches: 3-6 hours
Difficulty: Advanced (requires patience and precision)
Choosing Lubricant
For linear switches, Krytox 205g0 remains the industry-standard default because it is thick enough to smooth travel without much guesswork. Tribosys 3204 plays in a similar space, and Krytox GPL 105 is the thin oil people usually reserve for springs. For tactiles, thinner lubes such as Tribosys 3203 or Krytox 203g0 are safer because they preserve more of the bump.
Clicky switches are the exception. In most cases, do not lube the click mechanism at all, because the thing that annoys some people is also the thing you are paying for. If a spring in a clicky switch needs help, that is the one place a small amount of oil can make sense. Most hobby shops like NovelKeys, Divinikey, and similar vendors carry these lubricants consistently, with AliExpress as the slower budget route.
Lubing Technique: Linear Switches
Step 1: Disassemble Switch
- Use switch opener to open top housing
- Remove stem carefully
- Remove spring
- Keep bottom housing on workspace
Step 2: Lube Bottom Housing
- Apply tiny amount of 205g0 to brush
- Thin, even coat on rails where stem slides
- Coat center post lightly
- DO NOT over-lube (less is more!)
Step 3: Lube Stem
- Hold stem by stem legs (don’t touch lubed areas)
- Coat all four sides evenly
- Coat bottom of stem (where spring sits)
- Avoid stem legs (where stem enters housing)
Step 4: Lube Spring (Optional)
- Bag lube method: Put 20-30 springs in ziplock bag with small amount of GPL 105, shake vigorously
- Donut dip: Dip one end of spring into GPL 105, let it flow down
- Brush: Brush GPL 105 onto spring (time-consuming)
Step 5: Reassemble
- Place spring back in bottom housing
- Insert stem carefully (align properly!)
- Place top housing and press until click
- Test switch (should feel smooth, not mushy)
Common Mistakes:
- Over-lubing: Mushy feel, sluggish return
- Lubing stem legs: Can reduce travel, cause binding
- Uneven application: Inconsistent feel across keyboard
- Touching lubed surfaces: Oils from skin reduce lube effectiveness
Lubing Technique: Tactile Switches
Key Difference: Avoid lubing the tactile legs/bump area, or you’ll reduce tactility.
Modified Technique:
- Lube bottom housing (same as linear)
- Lube stem sides and bottom
- AVOID the tactile bump legs on stem sides
- Lube springs (same as linear)
Result: Smooth travel with preserved tactile bump.
Is Lubing Worth It?
Pros:
- Significant smoothness improvement (especially budget switches)
- Eliminates scratchiness
- Quieter switches
- Reduces spring ping
Cons:
- Time-consuming (2-6 hours)
- Requires patience and technique
- Can ruin switches if done poorly (over-lubing)
- Not reversible easily
Verdict: Worth it for enthusiasts and those building custom keyboards. Not necessary for casual users.
Switch Filming (Intermediate)
What Is Switch Filming?
Adding thin plastic films between top and bottom housing to reduce wobble and improve sound.
Time Investment:
- 70 switches: 1-2 hours
- 104 switches: 2-3 hours
Cost:
- $0.03-0.10 per switch ($3-10 per keyboard)
When to Film Switches
Film switches when the housings actually need help. Gateron, Kailh, and cheaper switches with audible inconsistency or visible wobble are the common candidates. Cherry MX and many premium switches already have tight enough tolerances that films either do very little or just add unnecessary work. The simplest check is physical: press the stem and wiggle the housing. If it feels loose or separates slightly, films may be worth the time.
Filming Technique
Step 1: Disassemble Switch Same as lubing - open top housing, remove stem and spring.
Step 2: Apply Film
- Place film on bottom housing
- Ensure film aligns with housing edges
- Film should have cutout for center post
Step 3: Reassemble
- Place spring and stem back
- Press top housing down firmly (film adds resistance)
- Ensure housing clicks shut completely
Step 4: Test Switch should feel tighter, less wobbly, and sound more consistent.
Film Types
Standard films from brands like Deskeys, TX, or Kelowna usually land around 0.125mm to 0.15mm in polycarbonate or PET, and for most people they are entirely sufficient. Premium films tend to promise tighter consistency more than radically different results, so they are worth treating as a finishing touch rather than a necessity.
Verdict: Budget films work fine for most users. Premium films offer marginal improvements.
Stabilizer Tuning (Essential Mod)
What Are Stabilizers?
Stabilizers support larger keys (Spacebar, Shift, Enter, Backspace) to prevent wobble.
Problem: Stock stabilizers rattle, tick, and sound terrible.
Solution: Tuning stabilizers fixes rattle and creates smooth, quiet keypresses.
Stabilizer Types
Plate-mount stabilizers are the common budget option: they clip into the plate, tend to be less stable, and usually take more effort to make sound good. PCB screw-in stabilizers are the premium default because they are more stable and easier to tune predictably. PCB snap-ins sit in the middle, with better fundamentals than plate-mount but less security than screw-ins.
Stabilizer Tuning Steps
Step 1: Disassemble Stabilizer
- Remove keycaps from stabilized keys
- Remove switches around stabilizers (if hot-swap)
- Unscrew stabilizers from PCB (screw-in) or unclip
Step 2: Clean Stabilizer
- Disassemble stabilizer housing and wire
- Wipe away factory lube (it’s usually bad)
- Clean with isopropyl alcohol if greasy
Step 3: Lube Stabilizer Housing
- Apply Krytox 205g0 to stabilizer housing:
- Inside walls where stem slides
- Bottom where stem bottoms out
- Thin, even coat (not too much!)
Step 4: Lube Stabilizer Wire
- Apply dielectric grease (thick) or 205g0 to wire ends
- Focus on where wire contacts housing
- This eliminates rattle and ticking
Step 5: Band-Aid Mod (Optional)
- Place small fabric band-aid on PCB where stabilizer bottoms out
- Apply thin layer of 205g0 on top of band-aid
- Reduces impact noise
Step 6: Holee Mod (Advanced)
- Cut small pieces of fabric band-aid
- Place inside stabilizer stem holes (where wire inserts)
- Eliminates wire rattle
Step 7: Reassemble and Test
- Insert wire into housing
- Screw or clip stabilizers back onto PCB
- Test by pressing stabilized keys (should be smooth, no rattle)
Stabilizer Tuning Tips
Balance Wire Properly: Stabilizer wire must be balanced (equal on both sides). If uneven, spacebar will be lopsided.
Don’t Over-Lube: Too much lube = mushy, sticky feel. Thin layers!
Test Before Reassembly: Test stabilizers before installing all switches. Easier to fix issues early.
Upgrade Stabilizers: If the stock stabilizers are beyond saving, Durock V2, TX stabilizers, and Staebies are the usual upgrade path, with price increasing alongside polish.
Case Dampening (Beginner-Intermediate)
What Is Case Dampening?
Adding foam or dampening material inside the keyboard case to reduce hollow sounds.
Time Investment: 30 minutes - 1 hour Cost: $10-30
Types of Foam
Case foam in the bottom of the board is the simplest way to cut hollowness, add a little weight, and soften the overall presentation. Plate foam, which sits between the plate and PCB, usually deepens sound and reduces vibration, though it can also make the board feel a touch softer. PCB foam under the PCB focuses more on taming resonance, while PE foam between PCB and switches is the deliberately stylized option that creates the poppy sound some people love and others immediately rip out.
Installation
Step 1: Measure Case Interior Measure internal dimensions of case.
Step 2: Cut Foam to Size
- Use neoprene, sorbothane, EVA foam, or PE foam
- Thickness: 2mm-5mm
- Cut to fit case (avoid screw holes and ports)
Step 3: Install Foam
- Place foam in case bottom
- Ensure it doesn’t interfere with PCB or screws
- Reassemble keyboard
Step 4: Test Sound should be deeper, less hollow.
Foam Alternatives
Shelf liner is the cheap, widely available option that works surprisingly well. Sorbothane damps more aggressively, but it is heavier and more expensive. Neoprene sits in the practical middle: good performance, reasonable cost, and less fuss than the premium materials.
Tempest Tape Mod (Beginner)
What Is the Tape Mod?
Applying painter’s tape or masking tape to the back of the PCB to change sound signature.
Effect:
- Deeper, “poppier” sound
- Reduces hollowness
- Adds rigidity to PCB
Time: 15-30 minutes Cost: $3 (tape)
How to Tape Mod
Step 1: Remove PCB from Keyboard Disassemble keyboard, remove PCB.
Step 2: Apply Tape to PCB Back
- Use 2-4 layers of painter’s tape or masking tape
- Cover entire back of PCB
- Avoid USB port area
- Ensure tape is smooth (no bubbles)
Step 3: Reassemble Keyboard Install PCB back into case and test.
Result: Sound signature changes from hollow to fuller, “marble” or “poppy” sound.
Tape Mod Controversy
Some people love the tape mod because it adds fullness and depth; others think it sounds artificial and overly poppy. The good news is that tape is cheap and reversible, so this is one of the few arguments in the hobby where “try it and decide” is the correct answer.
Force Break Mod (Intermediate)
What Is Force Break Mod?
Modifying plate to add flex, creating a softer, more forgiving typing experience.
How It Works: Cut slits in the plate between switch cutouts, allowing plate to flex more.
Effect:
- Softer typing feel
- More “bounce”
- Reduced harshness
Difficulty: Requires Dremel or cutting tool Risk: Permanent modification, can weaken plate
Spring Swapping (Intermediate)
Why Swap Springs?
Change actuation force, eliminate spring ping, or use progressive springs.
Common Swaps:
- Stock 55g → 62g (heavier)
- Stock 45g → 50g (slightly heavier)
- Stock spring → slow curve spring (progressive resistance)
- Stock spring → TX or Spirit springs (less ping)
Cost:
- $0.10-0.25 per spring
- $7-18 per keyboard
Spring Types
Standard Springs:
- Consistent force throughout travel
- Stock springs in most switches
Progressive (Slow Curve) Springs:
- Lighter at top, heavier at bottom
- More natural typing feel
Long Springs:
- Longer than standard
- Less spring ping
- Slightly different feel
TX Springs:
- High-quality steel
- Minimal ping
- Expensive ($0.20-0.30 per spring)
Spring Swap Process
- Disassemble switches
- Remove stock springs
- Insert new springs
- Reassemble switches
- Test feel
Combine with lubing: If you’re already disassembling switches to lube, spring swapping adds minimal time.
Frankenswitches (Advanced)
What Are Frankenswitches?
Combining parts from different switches to create custom switches.
Famous Frankenswitches:
- Holy Panda: Halo True stem + Invyr Panda housing
- Creamsicles: Cream stem + Tangerine housing
- Zealios: Various stems in Zeal housings
Purpose:
- Create unique sound/feel
- Optimize switch characteristics
- Experiment with combinations
O-Rings (Beginner, Not Recommended)
What Are O-Rings?
Rubber rings placed on keycap stems to reduce bottom-out noise and travel.
Pros:
- Cheap ($5-10)
- Easy to install
- Quieter bottom-out
Cons:
- Mushy feel
- Reduced travel
- Worse typing experience
Verdict: O-rings are a band-aid solution. Better to lube switches and tune stabilizers than use O-rings.
Recommended Mod Order
First Keyboard Mod (Beginner)
- Stabilizer tuning (biggest impact)
- Case foam (if hollow sounding)
Second Round (Intermediate)
- Tape mod (if desired)
- Switch lubing (time commitment)
Advanced Mods
- Switch filming
- Spring swapping
- Plate foam / PCB foam
Takeaway
Essential mods:
- Stabilizer tuning (always worth it)
- Case foam (if case sounds hollow)
High-impact mods:
- Switch lubing (time-consuming but transformative)
- Switch filming (if switches are wobbly)
Experimental mods:
- Tape mod (try it, it’s reversible)
- Spring swapping (if you want different weight)
Skip:
- O-rings (mushy feel)
- Over-engineering (diminishing returns)
Modding is personal. Not every mod works for every person. Experiment, and keep what you like.
Next Steps
- Stabilizers Guide - Deep dive into stabilizer types and tuning
- Sound Profiles - Understand keyboard sound characteristics
- Building Guide - Build your first custom keyboard