Keyboard Soldering Guide
Soldering looks intimidating until you do it once. In practice it’s a small, repeatable motion: heat the metal, introduce solder to the heated joint, then stop touching it and let it cool. When it goes well, the joint is both electrically reliable and mechanically strong. When it goes poorly, it’s usually for predictable reasons—insufficient heat, too much solder, or moving the joint while it cools.
This guide is written for keyboard builders, not electronics engineers. You’ll learn what matters for PCBs and switches, how to set up a safe workspace, how to get consistent joints, and how to fix mistakes without turning your PCB into a crime scene.
Why Learn Soldering?
Custom Keyboards
Many premium keyboards require soldering, either because the PCB is designed for it or because the build expects you to commit to a layout. Soldering also unlocks the full switch universe (including some pins and footprints that are less friendly to hot-swap sockets).
Repairs
Soldering is also a repair superpower. A dead switch, a ripped USB port, or a damaged socket isn’t automatically “throw it away” when you can rework the joint and replace a part.
Modifications
Finally, it’s how modders turn ideas into reality: adding components, adjusting LEDs, stabilizing questionable connections, and building layouts that aren’t available off the shelf.
Soldering vs. Hot-Swap
Hot-Swap Keyboards
Hot-swap is the easiest on-ramp. You can swap switches without tools beyond a puller, experiment freely, and fix mistakes instantly. The trade-offs are mostly long-term: sockets can wear out, the connection can be slightly less stable, and you’re limited to what’s compatible with the socket footprint.
Soldered Keyboards
Soldered builds feel “committed” in the best way. The connection is stable, there are no sockets to fail, and you can use essentially any MX-compatible switch that fits the PCB. The cost is that switch changes require desoldering, and mistakes are harder—but still fixable if you learn the basics.
Verdict: Beginners should start with hot-swap if they want the fastest success. Enthusiasts should learn soldering if they want ultimate flexibility and the ability to repair or rework boards long-term. Both approaches are valid; soldering is a skill, not a moral identity.
Soldering Tools and Materials
Essential Tools ($50-100)
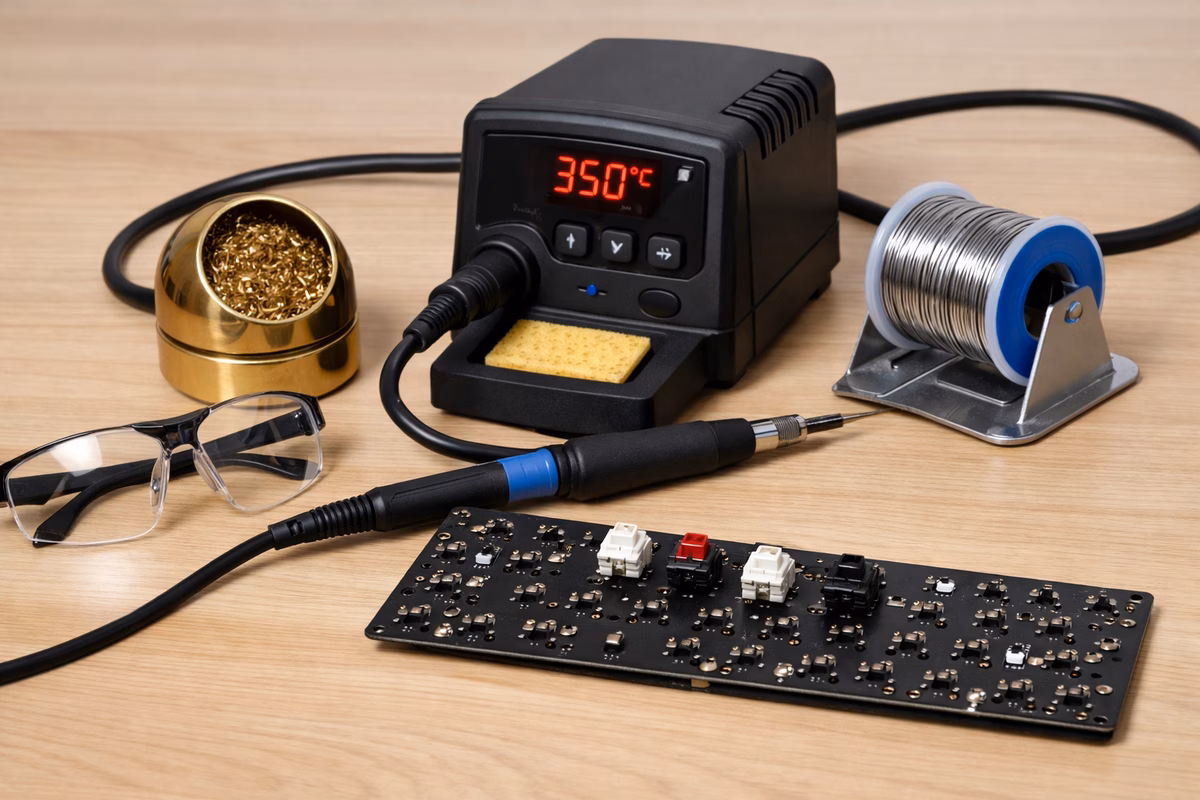
If you buy one good thing, make it the iron. A temperature-controlled iron (roughly 40–60W) makes learning dramatically easier because it keeps the joint hot enough without forcing you to hover and overcook the PCB. Popular picks in the keyboard world include the Hakko FX‑888D, TS100/TS80P, and Pinecil, but any stable, adjustable station is better than a cheap fixed-temp wand.
For solder, 63/37 or 60/40 tin-lead is the easiest to learn with because it flows predictably and solidifies cleanly. A diameter around 0.6–1.0mm is comfortable for switch pins. Lead-free works, but it’s fussier: higher temperatures, narrower “good joint” window, and more beginner frustration.
You’ll also want a solder sucker (desoldering pump) for mistakes and rework. Even if you think you won’t need it, you will—and having it on the desk turns panic into a two-minute fix.
Add flux. Flux isn’t “cheating”; it’s how you get clean flow without fighting oxidation. Rosin paste or liquid is fine and inexpensive.
Tweezers round out the essentials: they help straighten pins, place parts, and generally keep your fingers away from hot metal.
Optional Tools ($50-200)
Optional tools are about speed and comfort. A good desoldering tool (manual or powered) makes switch swaps far less annoying, and tip-cleaning gear helps keep joints consistent.
If you plan to solder more than one board, a stable station, a brass sponge (or similar tip cleaner), and a simple multimeter are the upgrades that pay for themselves in reduced frustration.
Safety Equipment
Treat safety as part of the build. Work near a window or use a fume extractor so you’re not inhaling flux fumes, wear eye protection (hot solder occasionally spits), and use a heat-resistant mat to protect the desk and keep your work stable.
Soldering Basics
How Soldering Works
Soldering is just controlled heat and timing. Touch the iron so it heats both the pad and the pin, then feed solder into the joint (not onto the iron tip). The solder melts because the joint is hot, flows where heat is, and forms a smooth fillet that bonds pad to pin. Then you remove solder, remove the iron, and let the joint cool without movement.
If you remember one principle, make it this: heat the joint, not the solder. When the joint is hot, solder behaves; when it isn’t, you get blobs, dull joints, and intermittent keys.
Good vs. Bad Solder Joints
A good joint looks like it belongs there: smooth, slightly concave, and evenly bonded to both pad and pin. Cold joints look dull or grainy and often form blobs that don’t “wet” the metal properly; they’re the common cause of keys that work sometimes and fail later. Too much solder creates large blobs and increases the risk of bridges (shorts). Too little solder leaves the pin under-bonded, which can crack with stress.
Step-by-Step: Soldering a Keyboard
Step 1: Gather Materials
You’ll Need:
- PCB
- Switches (matching your desired count)
- Plate (optional, depends on build)
- Stabilizers (pre-installed on PCB)
- Soldering iron
- Solder
- Flux (optional but recommended)
Step 2: Prepare Workspace
- Set up heat-resistant mat
- Organize tools within reach
- Ensure good lighting
- Open window or turn on fume extractor
- Heat soldering iron to 320-350°C (600-660°F)
Step 3: Test PCB (Optional but Recommended)
Before soldering, test PCB:
- Plug PCB into computer
- Use tweezers to short switch pad pairs
- Use keyboard testing website (keyboardtester.com)
- Verify all keys register
Why? Don’t want to solder 100 switches only to find a dead PCB.
Step 4: Install Stabilizers
- Insert stabilizer housings into PCB
- Screw in (screw-in type) or clip in (snap-in type)
- Insert wire into housings
- Test stabilizer movement (should be smooth)
Note: Stabilizers MUST be installed before switches (can’t access after soldering).
Step 5: Insert Switches
With Plate:
- Place switches into plate
- Align switch pins with PCB holes
- Press switches through plate into PCB
- Ensure all pins go through PCB (not bent!)
Without Plate (Plateless Build):
- Insert switches directly into PCB
- Ensure switches are flush with PCB
- May need tape to hold switches while soldering
Important:
- Check switch orientation (LED cutout faces same direction)
- Ensure pins aren’t bent
- Switches should sit flush
Step 6: Solder First Switch
Practice on corner switch first:
- Heat the joint: Touch iron tip to both the pad and switch pin (2-3 seconds)
- Apply solder: Feed solder wire to the joint (not the iron tip!)
- Solder flows: Solder melts and flows around pin and pad
- Remove solder wire: Pull solder away from joint
- Remove iron: Lift iron from joint
- Let cool: Don’t touch or move switch (2-3 seconds)
Check:
- Solder forms smooth cone around pin
- Pin is fully covered
- No solder bridges to adjacent pads
Step 7: Solder Remaining Switches
Strategy:
- Solder a few switches to hold PCB and plate together
- Then solder remaining switches systematically
- Work in rows or columns (organized approach)
Tips:
- Don’t rush (quality > speed)
- Clean iron tip regularly (on brass sponge)
- Add flux if solder isn’t flowing well
- Take breaks (prevents fatigue mistakes)
Step 8: Inspect Joints
After soldering all switches:
- Visually inspect every joint
- Look for cold joints, bridges, or insufficient solder
- Reflow any questionable joints (reheat and add solder if needed)
Reflow Technique:
- Heat joint with iron
- Add a tiny bit more solder if needed
- Let solder flow and cool
Step 9: Test Keyboard
- Plug keyboard into computer
- Test every key (use keyboard tester website)
- If key doesn’t work:
- Check solder joint on that switch
- Reflow joint if cold or insufficient
- Check for bridged pads (shorts)
Step 10: Clean PCB (Optional)
Remove flux residue:
- Use isopropyl alcohol (90%+ concentration)
- Scrub with soft brush or cloth
- Let dry completely
Why? Flux residue is sticky and attracts dust. Cleaning makes PCB look professional.
Desoldering Switches
When to Desolder
- Switch is faulty (chattering, not registering)
- Want to change switches
- Made soldering mistake
- Bought used keyboard and want to modify
Desoldering with Solder Sucker
Step 1: Heat Joint
- Heat soldering iron to 350-380°C (slightly hotter)
- Touch iron to solder joint until solder melts
Step 2: Remove Solder
- Place solder sucker nozzle near joint
- While joint is molten, trigger solder sucker
- Solder gets sucked into pump
Step 3: Repeat
- Clear pump (empty solder)
- Repeat until most solder is removed
Step 4: Remove Switch
- Gently wiggle switch while heating pins
- Switch should pull out once solder is cleared
Tips:
- Work on one pin at a time (2 pins per switch)
- Don’t force switch out (can damage PCB pads)
- Add fresh solder if old solder won’t flow (helps heat transfer)
Desoldering with Desoldering Gun
Easier and Faster:
- Heat gun tip while placing on joint
- Trigger vacuum while heating
- Solder is heated and sucked up simultaneously
Recommended Tool: Engineer SS-02 ($50) - best budget desoldering gun.
Desoldering Wick (Alternative Method)
How It Works: Copper braid absorbs molten solder.
Technique:
- Place wick on solder joint
- Press hot iron onto wick
- Solder melts and wicks into braid
- Move to clean section of wick, repeat
Pros:
- Cheap ($5 for roll)
- Portable
Cons:
- Slower than solder sucker
- Uses up wick quickly
Common Soldering Mistakes
Bent Pins
Problem: Switch pins bent during insertion, don’t go through PCB.
Solution:
- Carefully straighten pins with tweezers before inserting
- Don’t force switches into PCB
Cold Solder Joint
Problem: Joint didn’t get hot enough, solder looks dull and grainy.
Solution:
- Reflow joint with more heat
- Ensure iron is at correct temperature (320-350°C)
Solder Bridges (Shorts)
Problem: Solder connects two adjacent pads, causing keys to register together.
Solution:
- Use solder wick to remove excess solder
- Add flux and reflow to separate pads
Lifted Pads
Problem: PCB pad detaches from board (from overheating or excessive force).
Solution:
- Advanced repair: jumper wire from lifted pad to trace
- Prevention: Don’t overheat pads, gentle when desoldering
Too Much Solder
Problem: Excessive solder creates blobs, risk of bridges.
Solution:
- Use solder wick to remove excess
- Less is more—small amount of solder is enough
Switch Won’t Register
Problem: Key doesn’t work after soldering.
Solution:
- Check solder joint (reflow if cold)
- Test with multimeter (continuity between pin and trace)
- Check for damaged switch
Soldering Tips and Best Practices
Tip 1: Tin Your Iron
What: Coat iron tip with thin layer of solder before starting.
Why: Improves heat transfer, protects tip from oxidation.
Tip 2: Use Flux
What: Apply flux paste to pads before soldering.
Why: Solder flows better, easier to get good joints.
Tip 3: Clean Tip Regularly
What: Wipe iron tip on brass sponge or wet sponge frequently.
Why: Removes oxidation, maintains heat transfer efficiency.
Tip 4: Don’t Overheat
What: Don’t hold iron on joint for more than 3-5 seconds.
Why: Can damage PCB, lift pads, or damage switches.
Tip 5: Let Joints Cool
What: Don’t move or touch joints immediately after soldering.
Why: Movement while cooling creates cold joints.
Tip 6: Practice First
What: Practice on spare PCB or practice kit before soldering expensive keyboard.
Why: Build confidence and muscle memory.
Recommended Soldering Irons
Budget ($30-50)
Yihua 908D:
- Adjustable temperature
- Decent quality
- Good for beginners
Mid-Range ($50-100)
TS100 / TS80P (Portable):
- USB-C powered
- Compact, portable
- Fast heating
- Popular among keyboard builders
Pinecil:
- Similar to TS100
- Open-source
- USB-C powered
- $30-40
Premium ($100-200)
Hakko FX-888D:
- Industry standard
- Excellent temperature control
- Reliable, long-lasting
- Best for serious hobbyists
Weller WE1010NA:
- Professional quality
- Digital display
- Precise temperature control
Alternative: Build with Hot-Swap Sockets
Mill-Max Sockets
What: Hot-swap sockets you solder into PCB, then insert switches without soldering.
Process:
- Solder Mill-Max sockets into PCB switch holes
- Insert switches into sockets (no soldering!)
- Swap switches anytime
Pros:
- Converts any PCB to hot-swap
- Switch flexibility
- One-time soldering effort
Cons:
- Sockets cost $0.30-0.50 each ($30-50 per keyboard)
- Still requires soldering (sockets)
Takeaway
Soldering is a learnable skill: Start with practice, build confidence, then tackle your keyboard.
Essential skills:
- Heat joint properly
- Apply right amount of solder
- Inspect joints for quality
Tools matter: Invest in a quality temperature-controlled iron. It makes a huge difference.
Start simple:
- Practice on scrap PCB or switch tester
- Build 40% or macropad first (fewer switches)
- Graduate to full keyboards
Hot-swap is valid: You don’t NEED to solder. Hot-swap keyboards are excellent. But soldering unlocks ultimate customization.
Next Steps
- Building Guide - Complete keyboard build process
- Modding Guide - Advanced modifications
- Switch Guide - Choose switches for your build