Keyboard Sound Profiles Guide
Keyboard sound is subjective, personal, and surprisingly important. It’s also physical: every keypress is a little percussion instrument made from a case, a plate, a switch, keycaps, and the surface your keyboard sits on. A “sound profile” is shorthand for the overall character of that instrument—pitch (high vs. low), attack (sharp vs. rounded), resonance (ringy vs. controlled), and loudness.
One important note before we name anything: sound tests online are useful, but they’re not reality. Microphones emphasize different frequencies, rooms add reflections, and editing can make a board seem deeper or brighter than it is. Use recordings to narrow your search, then plan to fine-tune once it’s on your desk.
Why Sound Matters
Typing Satisfaction
Good sound feedback makes typing feel intentional. A clean bottom-out and a controlled return can create rhythm, reduce perceived harshness, and make a keyboard feel “better built” even when the switches are the same.
ASMR and Content
Keyboard audio has become its own genre—sound tests, ASMR, and streaming setups often treat the keyboard like an instrument. Profiles that read clearly on a mic (crisp attacks, consistent tone across keys) tend to be popular in content.
Workspace Compatibility
Sound is also social. The same board can be “satisfying” at home and “unacceptable” in a shared office. Your best profile is the one you can live with—day after day, meeting after meeting.
Main Sound Profiles
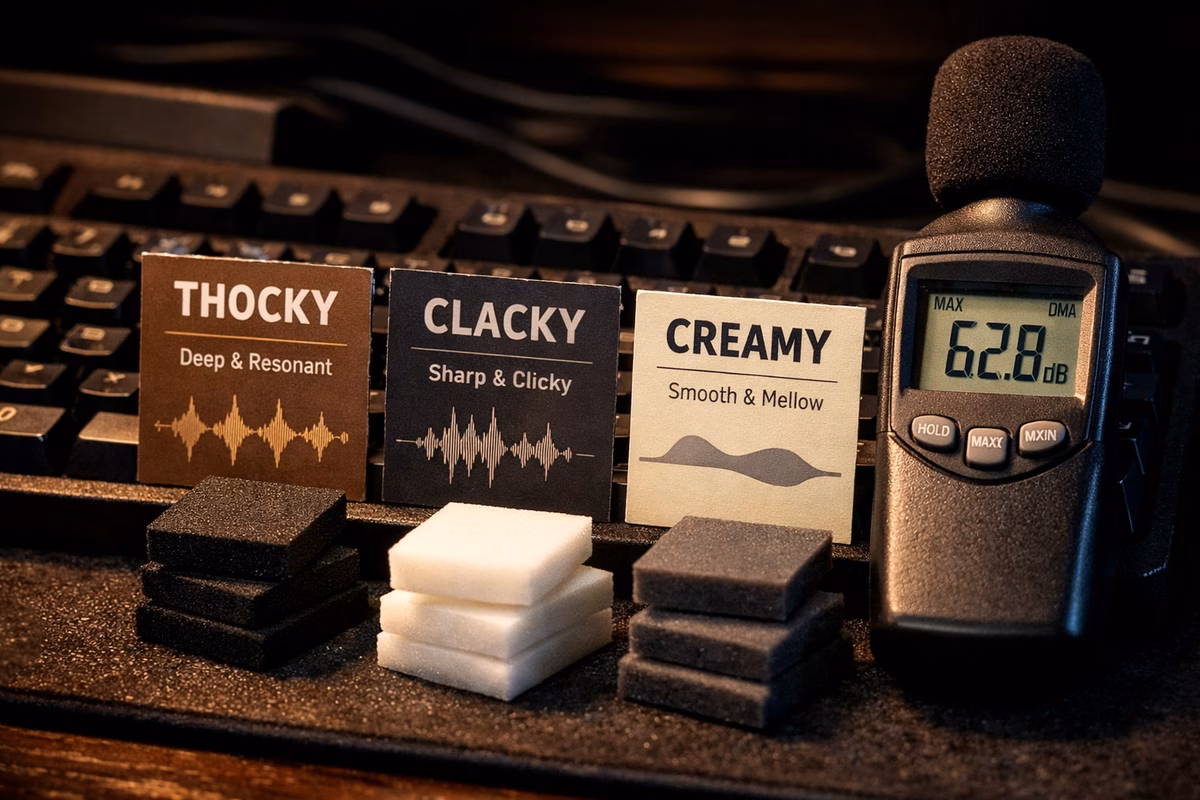
Thocky (Deep, Muted)
“Thock” is the classic deep, low-pitched, controlled sound—more bass than treble, with a rounded attack and a short, tidy decay. It often feels calm and substantial, like the board is absorbing energy instead of broadcasting it.
If you like a satisfying sound that doesn’t demand attention, thock is usually the safest target profile.
You’ll like thock if you want: depth, calmness, and a “built-like-a-tank” vibe.
How to achieve it (typical ingredients):
- A denser case (aluminum is the common baseline; brass weights help too)
- Softer mounting (gasket/leaf-spring) to reduce harshness
- Switches with POM/nylon-heavy housings, preferably lubed
- Thick PBT keycaps and sensible dampening (case/plate foam as needed)
Example Builds:
- Mode Sonnet + Boba U4T + PBT keycaps
- Keychron Q1 + lubed Gateron Oil Kings
- GMMK Pro + Holy Pandas
Clacky (Sharp, High-Pitched)
“Clack” is the bright, crisp end of the spectrum: a sharper attack, more upper frequencies, and a clearer “contact” sound on bottom-out. When it’s well-executed it feels fast and precise; when it’s not, it can read as harsh.
You’ll like clack if you want: clarity, speed, and a lively, percussive sound.
How to achieve it (typical ingredients):
- Stiffer mounting (top/tray) and/or firmer plates
- Less dampening (let the board speak)
- ABS keycaps for extra brightness
- Switches that don’t smother the top-end (often lightly lubed or stock)
Example Builds:
- Polycarbonate Bakeneko60 + Cherry MX Blacks + ABS keycaps
- Mode Envoy (PC plate) + Tangerine switches
- Any board with minimal foam and hard mounting
Creamy (Smooth, Soft)
“Creamy” is less about pitch and more about texture: the sound has rounded edges, minimal scratch, and a soft “whoosh” to the travel that blends into the bottom-out. Many people describe it as refined—like a board that has been carefully tuned rather than merely dampened.
You’ll like creamy if you want: smoothness, softness, and a “luxury” tone without going fully silent.
How to achieve it (typical ingredients):
- Lubed linears (consistent, not overdone)
- Softer mounting and a plate that doesn’t feel “pingy”
- Thick keycaps (often PBT) and carefully chosen dampening
- Optional: PE foam for a smoother, more blended presentation
Example Builds:
- Any board + Cream switches (heavily lubed)
- Keychron Q2 + lubed Gateron Milky Yellows + PE foam
- Mode Sonnet + lubed Alpacas
Marbly (Resonant, Sharp)
“Marbly” is the crisp, resonant sound that feels like two hard surfaces meeting: a clear, ringing “tock” with a bright sheen. It’s sharper than thock and often more resonant than clack—done well it’s clean and crystalline, done poorly it can sound hollow.
You’ll like marbly if you want: a distinct, bright signature that reads well in recordings and feels “clean.”
How to achieve it (typical ingredients):
- A case/plate combo that keeps the tone bright (PC and FR4 are common)
- Minimal foam (avoid swallowing the resonance)
- Tape mod to sharpen and unify the character
- Keycaps that don’t overly deaden the top-end (ABS often works well)
Example Builds:
- Polycarbonate KBD67 Lite + tape mod + Gateron Yellows
- Any PC case + tape mod + minimal dampening
Poppy (Lively, Energetic)
“Poppy” is lively and bouncy—often a bit higher in pitch, with a clean attack and a sense of separation between press and release. It’s the profile people chase when they want a keyboard that feels playful and “snappy” without being aggressively bright.
You’ll like poppy if you want: energy, definition, and that modern “PE-foam pop.”
How to achieve it (typical ingredients):
- PE foam between PCB and switches (the biggest lever for “pop”)
- FR4/PC plates and modest dampening
- Stock or lightly lubed switches (too much lube can blur the edges)
Example Builds:
- Any board + PE foam mod
- Keychron Q1 + PE foam + Gateron Black Inks
Silent (Muted, Quiet)
Silent builds prioritize not being heard. The profile is defined by what’s missing: reduced bottom-out, reduced top-out, and fewer stray noises (spring ping, stabilizer tick, case resonance). A great silent board is one you forget is mechanical until you feel it.
You’ll like silent if you need: office compatibility, late-night typing, or a mic-friendly setup without editing.
How to achieve it (typical ingredients):
- Silent switches first (the stem dampeners matter more than any foam)
- Tuned stabilizers (silence dies on a rattly spacebar)
- Dampening only as needed (too much can make the board feel mushy)
Example Builds:
- Any board + Boba U4 Silent + all foam installed
- Leopold FC660M + Cherry Silent Red (stock is great)
Factors Affecting Sound
Sound is the sum of many small choices. If you want predictable results, change one variable at a time and listen for what moved: pitch, loudness, harshness, resonance, or consistency across keys.
1. Case Material
Case material sets the baseline “body” of a keyboard. Metals tend to sound denser; plastics can sound lighter and sometimes hollow; wood often reads warm and naturally damped. It’s a real lever, but it’s rarely the only lever.
2. Mounting Style
Mounting decides how much energy reaches the case. Softer systems (gasket/leaf-spring) typically reduce harshness and “edge,” while firmer systems (top mount/tray mount) emphasize clarity and contact sounds. Plateless builds often sound muted and feel flexier.
3. Plate Material
Plates are “tone shapers.” All else equal, brass tends to add brightness and firmness; PC often softens and deepens; FR4 can feel crisp without being overly ringy. The best plate is the one that balances your target sound with the typing feel you want.
4. Switch Type
Switches define the “event” of the keypress. Linears usually sound cleaner and are easy to make creamy; tactiles add a tactile event that can introduce a little extra noise; clickies are an intentional sound generator and will dominate most builds.
5. Switch Housing Material
Housing plastics matter because they change how vibrations travel through the switch. Nylon-heavy housings often read deeper; PC-heavy housings often read brighter; POM can contribute a clean, muted “smooth” character. Many modern switches mix materials to land somewhere in between.
6. Keycap Material
Keycaps are the “drumhead.” Thick PBT often reads deeper and more muted; ABS often reads brighter and sharper. Thickness matters too: thicker caps usually lower the pitch and reduce ping; thin caps can sound lively but sometimes sharper.
7. Keycap Profile
Profile changes both acoustics and ergonomics. Taller profiles (like SA) can create more resonance and a bigger “note,” while lower, uniform profiles (DSA/XDA) can sound tighter and a little quieter.
8. Lubing
Lubing reduces friction noise and often rounds the edges of a sound profile. It’s one of the best ways to move from “scratchy and chaotic” to “smooth and consistent,” but too much lube can make switches feel sluggish and sound dull.
9. Dampening (Foam)
Dampening is a volume and resonance control, not a “make it good” button. Case foam can remove hollowness; plate/PCB foams can smooth and unify the sound. PE foam is its own special lever: it often adds that crisp, modern “pop,” especially on recordings.
10. Stabilizers
Stabilizers can make or break a sound profile. A perfect set of switches means nothing if the spacebar ticks or the enter key rattles. If you’re chasing a specific profile, tune stabilizers early so you’re not “hearing” problems instead of the profile.
Sound Profile Recipes
Treat these as starting points, not commandments. Your desk, keycaps, and even the room you type in will move the final result.
Recipe 1: Maximum Thock
Goal: Deep, muted, satisfying thock
Build around density and control: a heavier case (or a case with weight), soft mounting, and a plate that doesn’t shout. Add dampening only until hollowness disappears, then stop.
Example: Mode Sonnet + PC plate + Holy Pandas (lubed) + MT3 PBT keycaps
Recipe 2: Maximum Clack
Goal: Sharp, bright, crisp clack
Let the board breathe: firmer mounting, brighter plates, brighter caps, and minimal foam. The goal is clarity without harshness—tune stabilizers and avoid rattles that mask the crispness.
Example: Bakeneko60 (PC) + aluminum plate + Cherry MX Blacks (stock) + GMK keycaps
Recipe 3: Creamy Smooth
Goal: Smooth, soft, buttery sound
Chase texture: smooth linears, consistent lube, and a build that avoids sharp contact sounds. Moderate dampening often helps, but too much can erase the “creamy” character and turn it dull.
Example: Keychron Q2 + lubed NK Creams + thick PBT keycaps
Recipe 4: Marbly
Goal: Sharp, resonant, marble-like sound
Aim for clean resonance. Tape mod is the big lever here; keep foam minimal so you don’t suffocate the “stone” quality.
Example: KBD67 Lite (PC) + tape mod + Gateron Yellows + any keycaps
Recipe 5: Poppy
Goal: Lively, bouncy, energetic sound
Start with PE foam and keep everything else moderate. Poppy profiles tend to fall apart when the case is too hollow (unpleasant resonance) or too stuffed (no life).
Example: Any board + PE foam mod + Gateron Black Inks
Recipe 6: Silent
Goal: Minimal noise, office-friendly
Pick silent switches first, then tune stabilizers like your life depends on it. Add foam only to remove hollowness and remaining resonance—too much can make the board feel like typing into a pillow.
Example: Leopold FC660M + Cherry Silent Red (stock configuration is excellent)
Testing and Adjusting Sound
Sound tuning is easiest when you work in layers. If you build the full board first, it’s hard to know which change did what.
Sound Test Before Full Assembly
Install stabilizers, then put a handful of switches and a few keycaps in the alphas and a stabilized key (space/enter). Listen for the “deal breakers” first: stabilizer tick, spring ping, hollowness, and harshness. Once those are under control, chase your profile.
If you’re changing foam, change one layer at a time. If you’re changing lube, do a small batch of switches and compare. Consistency is the secret ingredient—especially for creamy and poppy profiles.
Recording Sound Tests
Recording is useful because your ears adapt quickly. Use the same microphone distance, the same surface, and the same sentence every time. If your results feel inconsistent, the biggest culprits are room noise and microphone placement—not your build.
Common Sound Problems
Hollow, Empty Sound
Large cavities can act like a little speaker box. Start with case foam to reduce the empty “box” resonance, then add plate/PCB foam only if the board still sounds uneven or harsh.
Pingy Sound
Spring ping is a switch problem first. Lube springs (or choose switches with better springs), then revisit case resonance if a metallic ring remains.
Rattly Sound
Stabilizers should sound like a clean “tap,” not a set of loose keys. Lube and balance the wire, then consider stabilizer pads or the holee mod if ticking persists.
Scratchy Sound
Scratch is travel noise. Lubing helps dramatically, but so does simply choosing a smoother switch (or a switch with tighter tolerances).
Mushy Sound
If the board sounds “dead” and feels sluggish, you’ve likely removed too much high-end. Back off lube, remove a foam layer, or switch to a slightly brighter cap/profile.
Takeaway
Sound isn’t a scorecard—it’s taste. Start with the environment you’re in (silent vs. expressive), pick a target (thock, clack, creamy, marbly, poppy), then tune one variable at a time. The best builds aren’t the ones with the most mods; they’re the ones where every part supports a coherent profile.
Next Steps
- Modding Guide - Modify your keyboard for desired sound
- Case Materials - Understand how materials affect sound
- Building Guide - Build a custom keyboard with specific sound profile