Your Complete Building Roadmap
So you want to build a tiny home. Maybe you’ve been binge-watching tiny house shows, pinning floor plans at 2 AM, or just staring at your rent statement wondering if there’s a better way. Good news: building a tiny home is absolutely achievable for anyone with basic construction skills, a healthy dose of patience, and enough determination to see it through. This guide is going to walk you through every single phase of construction, from the first bolt to the final coat of paint.
Here’s the thing most people don’t realize until they’re knee-deep in sawdust: a tiny home build isn’t really one big project. It’s more like a carefully choreographed sequence of smaller projects that absolutely must happen in the right order—structure first, then weatherproofing, then systems, then finishes. If you treat it like a checklist where you just tick boxes, you’ll end up spending money twice. But if you treat it like a flow, moving steadily from one phase to the next, you’ll make fewer of those dreaded “paint yourself into a corner” decisions that haunt builders at 3 AM.
Two principles will quietly save you months of headaches. First, make your big constraints explicit early. Whether you’re going trailer or foundation, your legal height and width limits, your climate, and your moisture control strategy—all of these affect every single downstream detail. Second, and this one is crucial: don’t close up your walls until your systems are tested. Once insulation and finishes go in, small mistakes transform into expensive ones with alarming speed.
Use this guide as a roadmap, not a rigid script. Your build will absolutely have detours—materials on backorder, weather delays, inspections that take longer than expected, a week where everything just… takes forever. That’s completely normal. Roll with it.
The Three Constraints to Decide Before You Buy Materials
Before you order a single two-by-four, you need to nail down three fundamental decisions that will shape everything else.
1) Mobile or stationary? This is the big fork in the road. A house on wheels (often called a THOW) is a transportation project just as much as it is a building project. Weight matters. Height matters. The forces your home will experience rolling down the highway at 55 mph absolutely matter. If you’re going stationary, you have more freedom with materials and dimensions, but you’ll deal with different permitting realities.
2) Climate and moisture load. Here’s something that surprises a lot of first-timers: tiny homes have what you might call a “humidity per cubic foot” problem. When you cook, shower, and just breathe in a space this compact, indoor humidity can spike fast. That makes your insulation and ventilation choices not just important, but genuinely critical to the health of both you and your home.
3) Your realistic time budget. If you can only build on weekends, your main enemy isn’t difficulty—it’s momentum. When you lose momentum, you lose context, you forget where you left off, and simple tasks take twice as long because you’re re-orienting. Plan your phases so you can complete a meaningful unit of work each session. Finishing a wall feels good. Leaving a wall half-framed for two weeks feels terrible.
Pre-Construction Planning
Timeline Expectations
Let’s talk about how long this is actually going to take, because timelines are where dreams collide with reality. Most build timelines are determined less by difficulty and more by consistency. If you’re building only on weekends, expect something in the neighborhood of 12 to 18 months for a full DIY build. That might sound like a lot, but weekends go fast, weather steals some of them, and life has a way of interrupting the rest.
If you can work on it full-time with steady access to tools and decent weather windows, 3 to 6 months is a much more realistic range. Having reliable help can compress the schedule further, but even then, the build tends to come in distinct phases. Framing and drying-in goes surprisingly fast—you’ll feel like a construction superhero. Then systems and finishes arrive, and suddenly you’re spending an entire Saturday installing one window perfectly.
There’s also a popular hybrid approach: hire out the shell (the structural frame, roof, and exterior envelope) and take on the interior yourself. Many builders who go this route finish the inside in roughly 2 to 4 months of part-time work, or about 3 to 6 weeks working full-time. Your real schedule driver will often end up being inspections and long-lead items like custom windows, specialty hardware, or that perfect compact appliance you fell in love with that ships from Germany.
Budget Planning
Tiny home budgets have this funny way of feeling “smaller” than traditional home budgets—right up until they don’t. They don’t forgive wishful thinking. As a broad DIY range, many builds land somewhere between $22,500 and $45,000, while more contracted builds can easily reach $45,000 to $90,000 or more, depending on your systems and finish level.
Where does all that money go? If you’re building on wheels, the trailer alone typically eats 15 to 20 percent of your total budget. Materials claim the biggest slice after that—lumber, sheathing, roofing, siding, all the stuff that becomes your house. Systems like electrical, plumbing, HVAC, and water heating form the next significant chunk. And then there’s labor, which is where DIY versus contracted builds diverge dramatically.
Here’s what catches people off guard: the hidden costs. Permits and inspections add up. Material delivery fees are real. Waste and mistakes—yes, a real percentage of your materials will end up in the dumpster, and that’s just the cost of building. You’ll need tools you don’t currently own. And at some point, you’ll probably want to hire a professional for the high-consequence stuff like service entry electrical, gas work, or tricky plumbing connections.
A Budgeting Mindset That Prevents Regret
Tiny homes punish optimistic budgets more harshly than traditional homes because there is simply less room to “hide” compromises. That cheap window you bought to save $200? It leaks comfort every single day. That bargain ventilation solution? It leaks health. Those discount fasteners? They leak durability.
If you need to cut costs—and most of us do—cut them strategically. Spend your money where it truly matters: envelope quality like roofing, flashing, windows, doors, air sealing, and insulation, plus safety and code items like electrical protection, venting, and detectors. Save on the things that are easy to upgrade later without tearing the house apart—paint, hardware, decorative touches. You can always swap out cabinet pulls in year two. You cannot easily re-insulate your walls.
Skill Assessment
You don’t need to be a seasoned contractor to build a tiny home, but you do need a baseline comfort with carpentry and, perhaps more importantly, the willingness to learn patiently. If you can measure accurately, cut cleanly, fasten securely, and keep things square, plumb, and level, you can make real and meaningful progress. Experience with electrical, plumbing, and finish carpentry certainly helps, but you can also hire out the pieces where mistakes are particularly expensive or dangerous.
Many first-time builders choose to hire professionals for specific tasks: trailer or foundation prep, service entry electrical work (the panel and hookup), plumbing rough-in, spray foam insulation, or roofing when the material or geometry is unforgiving. If you’re only going to hire out one thing, the two most common choices are electrical service entry and spray foam insulation. Both are high-consequence tasks where professional speed and consistency are genuinely worth the money.
Phase 1: Foundation (Weeks 1-2)
Trailer Selection
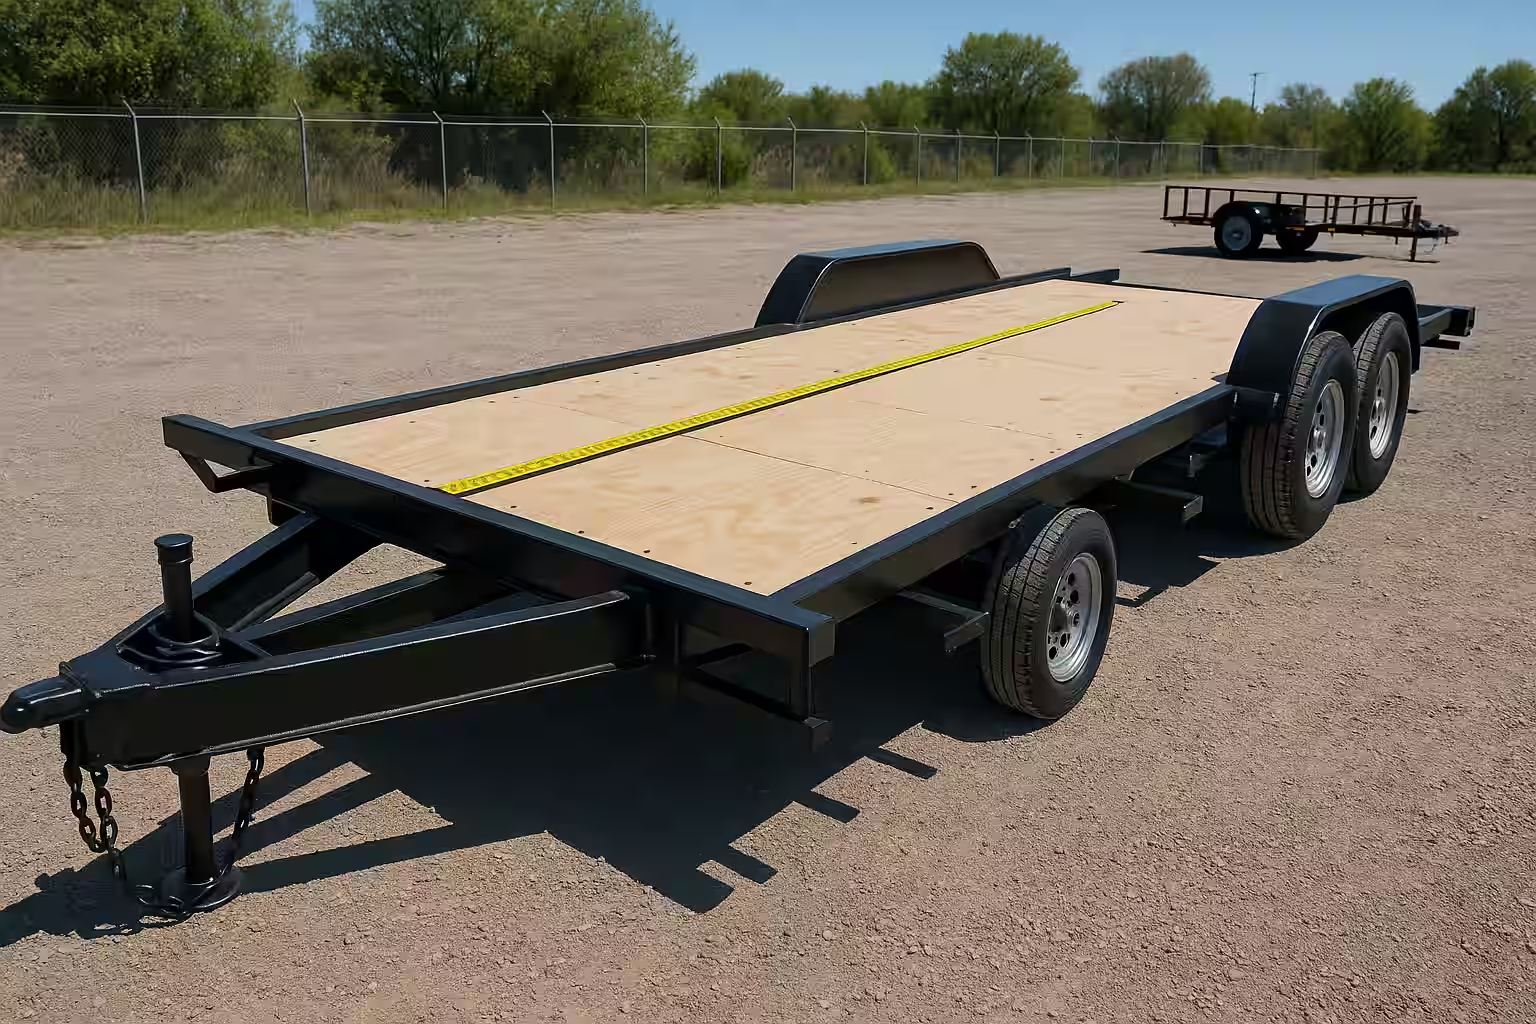
For a house on wheels, the trailer isn’t just the foundation—it’s the most important structural decision you’ll make. Common lengths range from 16 to 28 feet, with many builds landing in the sweet spot of 20 to 24 feet. Road-legal width is typically 8.5 feet without requiring special permits, and you want enough Gross Vehicle Weight Rating (GVWR) to leave a comfortable margin for water, cabinetry, and all those interior finishes that add up faster than you’d expect. For most builds, that means a minimum GVWR of 10,000 to 14,000 pounds, depending on size and materials.
Look specifically for a steel I-beam tiny-home trailer—not a light RV frame and definitely not a utility trailer. The frame geometry matters enormously for proper weight distribution. The non-negotiables here are all about structure and safety: a properly welded steel frame, functional brakes on all axles, safety chains, a properly rated hitch, outrigger and leveling support, and a solid moisture barrier strategy at the deck edge.
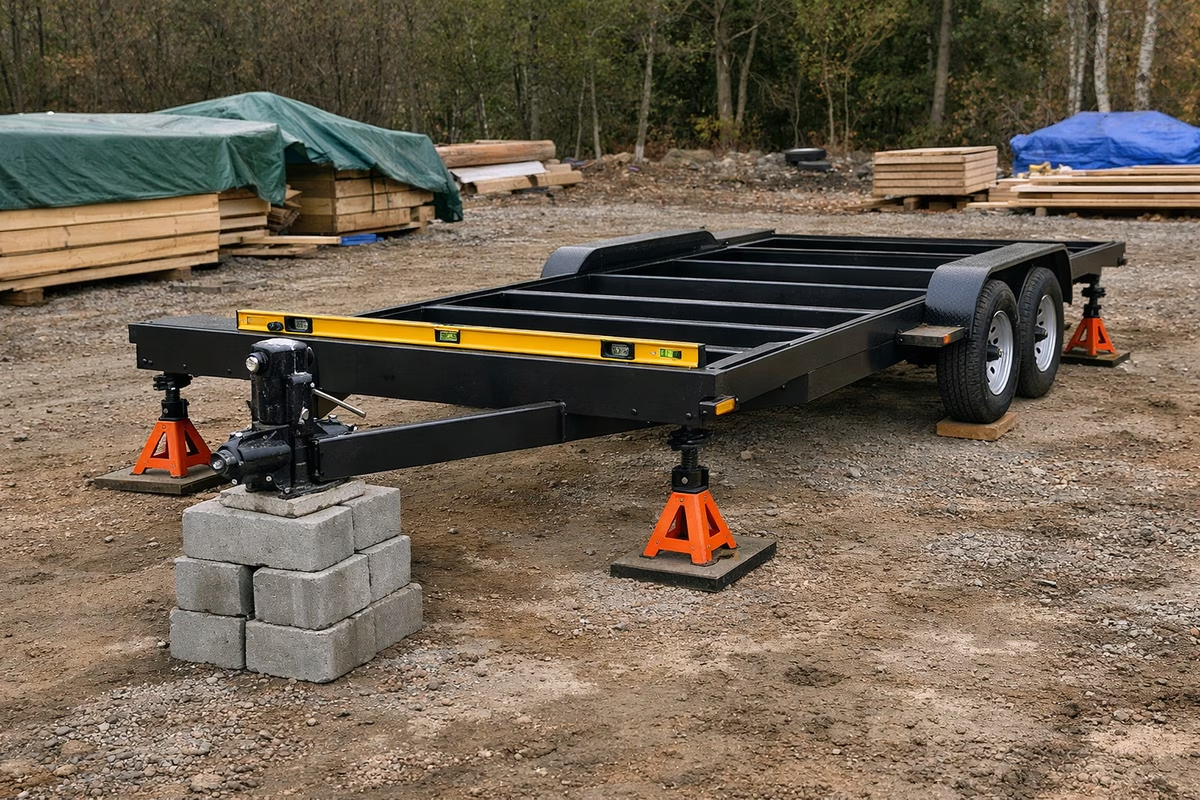
Before you start framing, prep that trailer like you won’t get another chance—because honestly, once the floor is down, you mostly won’t. Inspect everything for rust and damage, treat and protect the steel, install a moisture barrier (flashing or composite materials are common choices), add outriggers for leveling, and mark your stud locations so you can reference them later when you’re securing the structure. This unglamorous prep work pays dividends for the entire life of the build.
Weight and Balance (The Part That Sneaks Up Later)
Here’s a truth that experienced builders wish someone had tattooed on their forearms: most “my tiny home tows terribly” stories come down to weight distribution and tongue weight. It’s not that the home is too heavy—it’s that the weight is in the wrong places.
As you build, keep a running list of your heavy components—water heater, batteries, refrigerator, cabinetry, tile, large tanks—and note where each one lands relative to the axles. You don’t need to do exact engineering math (though it doesn’t hurt). Even practical planning gets you most of the way there: keep heavy items low, keep major weight concentrated near the axles, and resist the temptation to stack heavy systems on one end just “because it fits.” These three simple habits prevent an astonishing amount of towing misery.
Remember, it’s much easier to move a plan line on paper than to relocate a water heater after the cabinets are already installed around it.
Foundation Anchoring
When it comes to securing your framing to the trailer, this is where structural integrity begins. Use structural brackets or hurricane ties, and through-bolt or lag-bolt your floor framing directly into the trailer frame—not just into the deck surface. A common baseline is 3/8-inch bolts with tight perimeter spacing, but the right answer depends on your specific trailer design and local requirements. The important rule is dead simple: never rely on screws into the trailer decking as your primary structural connection. The deck is a surface, not a structural member.
Phase 2: Framing (Weeks 3-6)
Floor Framing
Think of your floor as a structural sandwich, and each layer matters. You’ll start with rim joists—often 2x6 or 2x8, sometimes pressure-treated depending on your exposure conditions. Floor joists sit on appropriate centers (16 inches is the standard choice), with blocking added wherever you need extra stiffness. The subfloor ties it all together, and here’s where you don’t want to skimp: glue and screw that subfloor so it behaves as one stiff, unified plate. For materials, 3/4-inch Advantech or tongue-and-groove plywood are popular choices because they resist squeaks and minimize movement over time.
Insulation choices for the floor vary by climate and assembly type. Rigid foam, spray foam, and mineral wool (like Rockwool) can all work beautifully depending on your situation. What truly matters is that you plan your penetrations and moisture control strategy before you start closing things up. And here’s the thing about tiny homes: they have significantly more service penetrations per square foot than larger homes. Plumbing drains, supply lines, vents, and electrical runs all need to pass through that floor. Decide early how you’ll route everything so you aren’t drilling through critical framing later and cursing your past self.
Before you commit to your floor assembly, give serious thought to thermal bridging and those service penetrations. As a general rule, keep your vapor control on the warm side of the assembly for your climate strategy. Getting this right now means you won’t be dealing with mysterious condensation problems later.
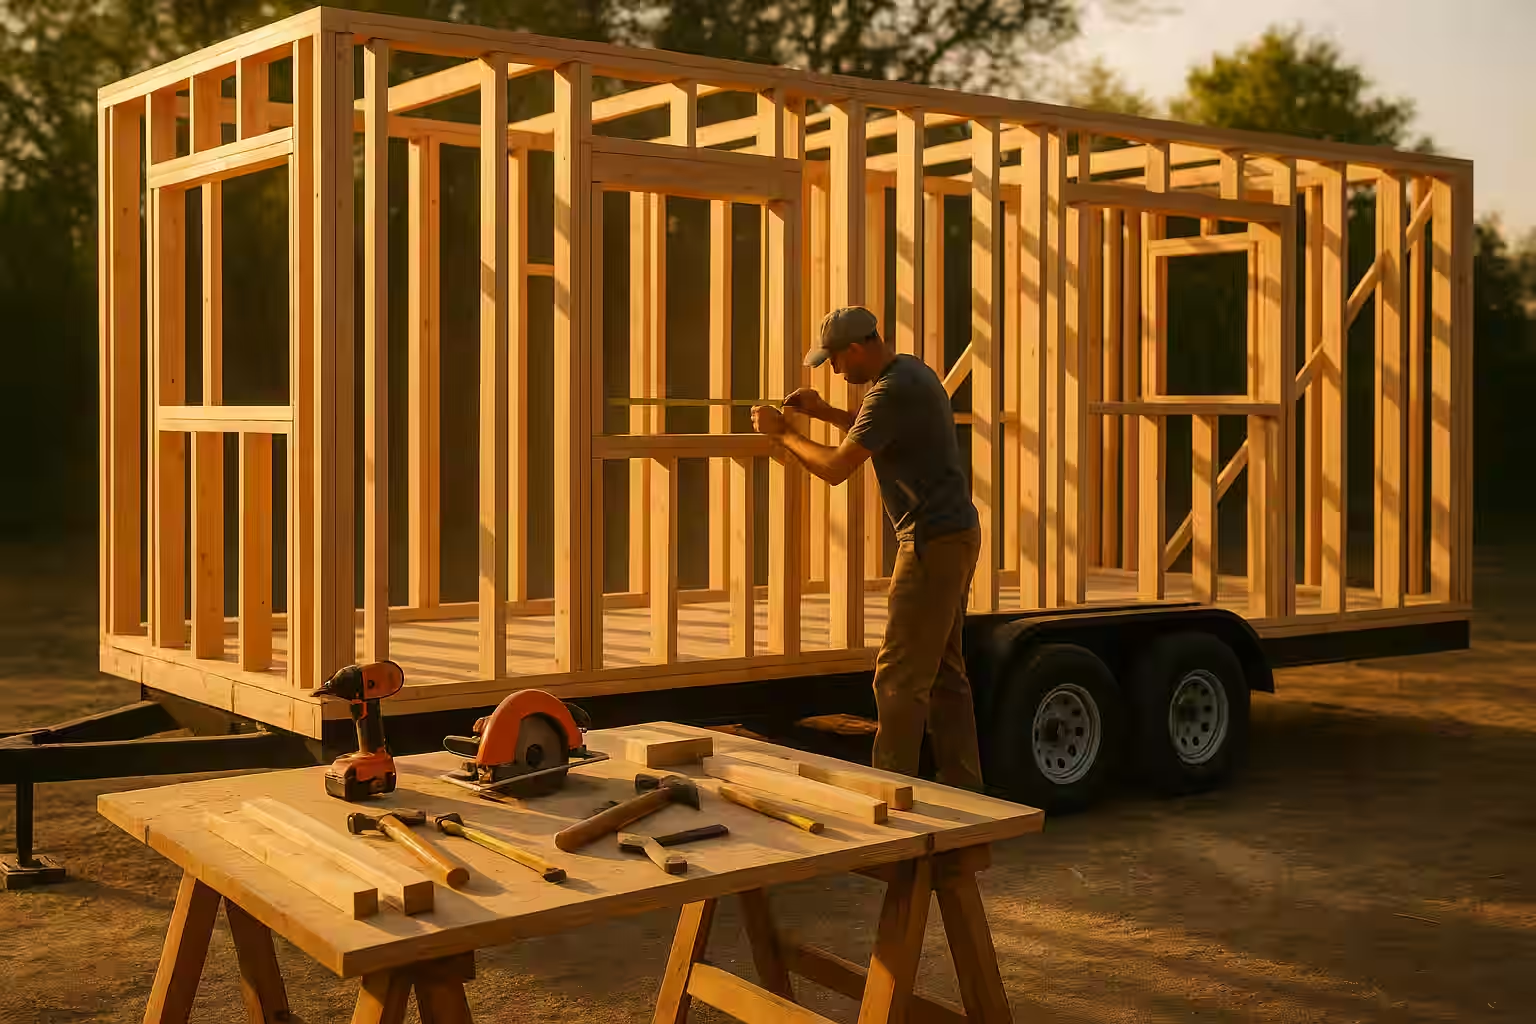
Wall Framing
Wall framing is the moment when your build transforms from “trailer with a floor” to something that actually looks like a house. It’s incredibly satisfying. A common approach starts with a treated bottom plate anchored firmly to the floor, followed by 2x4 studs on 16-inch or 24-inch centers, a double top plate where needed for strength and header support, and 1/2-inch plywood or OSB sheathing for overall stiffness. Headers over your doors and windows—often 2x6 or 2x8 depending on spans and loads—should match your plan and local code requirements.
If you’re building on wheels, height becomes a hard constraint astonishingly fast. Many builds aim for a main-floor interior ceiling height in the 6-foot-6-inch to 7-foot range, with a loft that’s comfortable enough to sleep in (typically 3-foot-6-inch to 4-foot clearance), all while keeping the total road height under common limits—usually around 13 feet 6 inches. Measure everything twice and remember to treat your roof thickness as part of the total height budget. That extra 6 inches of roof assembly has caught more than a few builders by surprise.
Practical framing habits make a world of difference. Keep everything square by using a 3-4-5 triangle check regularly. Pre-drill near board ends to prevent splitting—nothing kills momentum like a cracked stud. Build your walls flat on the deck whenever possible before tipping them up into position. And please, take photos as you go. Photographs of your framing and rough-ins will be absolutely priceless later when you’re hanging cabinets, hunting for studs behind finished walls, or troubleshooting a mysterious wire route.
Roof Framing
Roof Styles:
Your roof choice is fundamentally a geometry decision, and each style comes with its own personality. Shed roofs are the simplest to build and often the most space-efficient for lofts because the single slope creates predictable headroom—you always know exactly how much clearance you have at any point. Gable roofs give you that classic, traditional tiny house look and can maximize loft space with their symmetrical peak, but they add complexity to the framing. Gambrel or barn-style roofs can create the most interior volume of any option (especially wonderful if you dream of having two lofts), but they’re significantly more complex to frame and flash properly.
Roof Construction:
- Install ridge beam (if gable)
- Cut and install rafters (16" or 24" O.C.)
- Add collar ties (required for strength)
- Install roof sheathing (1/2" OSB or plywood)
- Add drip edge
- Install roofing underlayment
- Apply roofing material
At the roof stage, treat flashing and water management like primary structure, not a finishing detail you’ll get to later. A tiny home is small enough that a single chronic leak can affect a startlingly large percentage of your interior. Every joint, every transition, every penetration through the roof needs to be flashed like your furniture depends on it—because it does.
When it comes to roofing materials, you have several solid options. Standing seam metal is the gold standard: it’s the most durable choice, lasting 50 years or more, and it sheds water beautifully. Architectural shingles offer a good balance of cost and performance with a 20-to-30-year lifespan. Metal panels provide a budget-friendly option that still delivers 20 to 30 years of reliable service. And if you’re working with a flat or very low-slope roof, EPDM rubber membrane is a proven solution with a 15-to-25-year lifespan.
Phase 3: Exterior (Weeks 7-10)
Windows and Doors
Window Installation:
- Check rough opening (level and square)
- Apply flashing tape to sill
- Set window, shim level
- Nail through flange
- Flash sides and top (overlapping down)
- Insulate gaps with minimal-expanding foam
Slow down here. Seriously, put down the nail gun and take a breath. Window and door installation is one of the highest-leverage points in your entire build when it comes to long-term comfort. A slightly out-of-square opening becomes a stubborn air leak that will haunt you for years, wasting energy and letting drafts sneak in every time the wind blows.
When choosing window types, each style brings different strengths to a tiny home. Double-hung windows are the traditional choice with solid ventilation options since you can open both top and bottom sashes. Casement windows provide the best seal of any operable window type and offer maximum ventilation when cranked fully open. Fixed windows are your cheapest option and let in beautiful light, but they offer no ventilation whatsoever, so use them strategically. And don’t overlook skylights, especially for loft spaces—they can be absolutely essential for making a loft feel livable rather than cave-like.
For your entry door, you’ll want a minimum width of 32 inches, though 36 inches is more comfortable and often required by code. If you’re a beginner, go with a pre-hung door—the frame comes assembled and square, which saves you a tremendous amount of fussing. Make sure you invest in proper weatherproofing and a quality threshold, because your front door will see more traffic per square inch than any other surface in the house.
Exterior Siding
Choosing your siding is one of those decisions that shapes your tiny home’s personality, so let’s talk through the options. Cedar or pine wood siding is undeniably beautiful and gives you that natural, warm aesthetic that photographs so well. The trade-off is maintenance—you’ll be re-staining or re-painting every few years—and it typically runs $3 to $6 per square foot. Fiber cement is the durability champion: it’s fire-resistant and long-lasting, but it’s heavy, which is a real concern if you’re building on wheels. Expect to pay $2 to $4 per square foot. Corrugated or standing seam metal siding is lightweight, incredibly durable, and gives your home a crisp modern look for $2 to $5 per square foot. Vinyl is the low-maintenance, budget-friendly pick at $1 to $3 per square foot, though it can look a bit cheap if you’re not careful with the selection. And board-and-batten siding brings a wonderful rustic charm that’s surprisingly forgiving of imperfections—a genuine friend to the DIY builder.
No matter which siding you choose, the installation principles stay the same. Always start from the bottom and work your way up, because water flows downhill and your overlaps need to follow that gravity. Overlap your pieces properly so water sheds naturally. Leave expansion gaps because materials move with temperature and humidity. Use stainless steel or coated fasteners (regular steel will rust and stain your beautiful new siding within a year). And flash meticulously around every single penetration—vents, outlets, hose bibs, all of it.
Exterior Finishing
Trim work is what transforms your tiny home from “construction project” to “actual house.” You’ll need corner boards to create clean transitions where walls meet, window and door trim to frame your openings attractively, rake and eave trim to finish off the roofline, and a belly board or skirt around the trailer to give it that polished, intentional look.
Weatherproofing is the final exterior step, and it deserves your full attention. Caulk every seam and gap you can find, then find a few more you missed. Apply paint or stain where your materials require it. Check your flashing everywhere—around windows, doors, roof transitions, wall penetrations, everywhere. And then do the hose test. Grab a garden hose and spray every exterior surface methodically while someone watches from inside. This is not optional if you can possibly do it. It’s far, far better to discover a leak while you can still see the framing than to find out three months later when a mysterious stain appears on your beautiful new shiplap.
Phase 4: Rough-Ins (Weeks 11-14)
Electrical Rough-In
Electrical planning is where you need to think about how you’ll actually live in this space. If your home is mobile, you’ll typically run a 30-amp or 50-amp RV-style service. For a permanent installation, a 100-amp or 200-amp service gives you more capacity. Your main breaker panel will typically support 8 to 12 circuits, which is more than enough for most tiny homes when planned thoughtfully. Remember that GFCI outlets are required in kitchens, bathrooms, and exterior locations, while AFCI breakers are a code requirement for bedrooms.
When mapping out your circuit layout, think about it in terms of how your home actually functions. Kitchen appliances need their own dedicated circuits—that microwave and toaster oven running simultaneously will trip a shared breaker every single time. Your bathroom needs GFCI protection. Living area outlets, loft and bedroom outlets, and lighting circuits each deserve their own runs. Don’t forget dedicated circuits for your HVAC or mini-split system, water heater, and washer/dryer if you’re including those.
Here’s a tip that sounds obsessive but will save you enormous headaches: label everything as if future-you is a complete stranger who has never seen this house before. In a tiny home, electrical runs are tighter and more layered than in a conventional build. Clear labels and photos of your wiring before insulation goes in will reduce mistakes dramatically during trim-out. When running your wires, use 12-gauge wire for your 20-amp circuits, staple every 16 inches and within 8 inches of every box, and leave at least 8 inches of wire in each box so you have room to work when it’s time to install devices.
Plumbing Rough-In
Plumbing in a tiny home follows the same principles as any home, just in a much more compact space. For your supply lines, PEX has become the go-to for most tiny home builders—it’s flexible, forgiving, and relatively easy to work with. Copper is a classic choice that’s arguably more durable but harder to run in tight spaces. For drains, PVC or ABS pipe is standard, and every fixture needs proper venting. Install shut-off valves at every single fixture; you’ll thank yourself profusely the first time you need to service a faucet without shutting down the whole system.
Your fixture planning should account for standard drain sizes: 1.5-inch drains for kitchen and bathroom sinks, a 2-inch drain for the shower, a 3-inch drain for a standard toilet (connected to your main vent stack), and a 2-inch drain for a washing machine if you’re including one. All fixtures need proper venting—this isn’t optional, and it’s not just about code. Without proper venting, your drains will gurgle, flow slowly, and potentially allow sewer gases into your tiny living space. Not ideal.
For hot water, you’ve got some great options scaled perfectly for tiny living. Tankless water heaters (either electric or propane) deliver unlimited hot water efficiently and take up almost no space. A small tank unit in the 6-to-10-gallon range is simpler and more affordable, though you’ll need to manage your hot water usage a bit more carefully. Point-of-use on-demand heaters save space by sitting right where you need hot water.
Your water system type depends on how you’ll live. An RV-style setup with fresh, gray, and black tanks gives you full mobility and off-grid capability. A traditional connection to city water or well, with septic or sewer, works for permanent installations. And a hybrid system—hookup-ready with onboard tanks—gives you the best of both worlds for those who want flexibility.
One thing that gets overlooked constantly: plan for service access. Install shut-off valves where you can actually reach them. Put unions where you might need to disconnect a fixture or appliance someday. Include removable panels near pumps, valves, and water heaters. Tiny homes are compact by definition, and a little access planning now prevents an awful lot of demolition later.
HVAC Rough-In
When it comes to heating and cooling your tiny home, the mini-split heat pump is the reigning champion for good reason. It provides both heating and air conditioning in a single, efficient, remarkably quiet package. Yes, the upfront cost of $1,000 to $2,500 installed is higher than some alternatives, but the efficiency savings and the sheer convenience of having heating and cooling in one system make it the most popular choice among tiny home builders by a wide margin.
That said, there are compelling alternatives depending on your situation. A vented propane wall heater is efficient, affordable at $300 to $800, and works perfectly if you don’t need air conditioning (maybe you’re in a mild climate or rely on windows and fans for summer cooling). Electric baseboard heaters are the simplest option at $100 to $300—easy to install yourself, but they’re inefficient and expensive to operate, so they’re best as supplemental heat. And then there’s the wood stove: romantic, off-grid capable, and there’s nothing quite like the warmth of a real fire. Just know that the required clearances eat into your precious floor space, they need regular maintenance, and the cost runs $800 to $2,000 before installation.
No matter which heating option captures your heart, prioritize ventilation above all else. A tight, well-insulated tiny home without deliberate ventilation will accumulate moisture and odors with alarming speed. You’re essentially living inside a thermos—which is great for energy efficiency, but it means you need a planned path for fresh air exchange.
Phase 5: Insulation (Week 15)
Insulation Types
| Type | R-Value per inch | Pros | Cons |
|---|---|---|---|
| Spray Foam | R-6 to R-7 | Best seal, moisture barrier | Expensive, needs pro |
| Rockwool | R-4 | Fire-resistant, sound dampening | Itchy, needs vapor barrier |
| Fiberglass | R-3.5 | Affordable, DIY-friendly | Settles, moisture issues |
| Rigid Foam | R-5 to R-6 | Good for floors/roof | Expensive, seams need sealing |
Each insulation type has its personality. Spray foam gives you the best air seal and doubles as a moisture barrier, but it’s expensive and really needs professional installation to perform properly. Rockwool is a fantastic performer—fire-resistant, excellent at sound dampening, and it doesn’t sag over time—though it requires a separate vapor barrier and the fibers are itchy to work with. Fiberglass batts are the most affordable and DIY-friendly option, but they can settle over time and are more susceptible to moisture problems if your vapor control isn’t dialed in. Rigid foam boards offer excellent R-value per inch and work beautifully in floors and roof assemblies, though the seams need meticulous sealing to prevent air bypass.
For target R-values, aim for R-13 to R-21 in your walls, R-30 to R-40 in your roof (heat rises, so don’t skimp here), and R-10 to R-20 in your floor. Your vapor barrier goes on the warm side of the insulation—always. This prevents condensation from forming inside your wall cavities, which is one of the most destructive things that can happen to a tiny home. Use 6-mil polyethylene sheeting or foil-faced foam, and tape every single seam.
If you want one simple “building science” target to guide your decisions, here it is: aim for a house that is tight on air leaks, controlled on vapor, and intentionally ventilated. The worst condensation problems don’t come from too much moisture in the air—they come from accidental airflow through cracks, where warm, moist air reaches cold surfaces hidden inside your wall cavities. Seal the envelope, control the vapor, and then ventilate on purpose through systems you choose. That’s the recipe.
Phase 6: Interior Finish (Weeks 16-22)
Walls and Ceilings
This is the phase where your tiny home stops looking like a construction project and starts looking like a place you’d actually want to live. It’s enormously satisfying.
For wall coverings, you have wonderful options that each bring a different character to the space. Traditional drywall works well in 1/4-inch or 3/8-inch thicknesses to save weight—skip the standard 1/2-inch you’d use in a regular house. Shiplap has become the darling of the tiny home world for good reason: it’s rustic, beautiful, and surprisingly DIY-friendly. Plywood panels, especially with tongue-and-groove profiles, give you an affordable modern look that’s both warm and distinctive. And decorative paneling offers the quickest installation of any option, with the lightest weight and a huge variety of styles.
When installing your wall and ceiling finishes, always do the ceiling first, then the walls. This way, your wall material covers the ceiling-to-wall joint cleanly. Screw into your studs at every 16-inch center, fill seams and nail holes with the appropriate filler, sand everything smooth, and then prime and paint or stain. Interior finishes are where tiny homes become deeply personal, but keep maintenance in mind. Kitchens and baths produce steam and splashes constantly, so choose wall finishes in those areas that can tolerate wiping and occasional humidity without deteriorating.
Flooring
Flooring choice in a tiny home is all about balancing looks, durability, weight, and water resistance. Luxury Vinyl Plank has emerged as the most popular choice for tiny homes, and for good reason: it’s completely waterproof, impressively durable, looks convincingly like real wood, and installs with a satisfying click-lock system that feels like assembling a puzzle. At $2 to $4 per square foot, it hits the sweet spot of quality and value.
Laminate flooring gives you an enormous range of styles at the most affordable price point ($1 to $3 per square foot) with an easy installation process, but here’s the catch—it’s not waterproof. In a tiny home where your kitchen might be three feet from your bathroom, that matters. Real hardwood is beautiful and classic, with the wonderful advantage of being refinishable when it inevitably gets scratched, but it’s expensive ($4 to $8 per square foot) and adds meaningful weight. Tile is the ultimate durability and waterproofing champion at $3 to $6 per square foot, but it’s heavy, cold underfoot, and generally benefits from professional installation to ensure proper adhesion and waterproofing in a structure that moves (if you’re on wheels).
Kitchen Installation
The kitchen is the heart of any home, and in a tiny house, it’s also one of the most carefully engineered spaces. Your layout choice will largely depend on your floor plan. A galley layout—parallel counters facing each other—is the most efficient configuration for tiny homes, giving you maximum counter and storage space in the smallest footprint. An L-shaped layout works beautifully in corners and creates a natural work triangle. A single-wall kitchen is the simplest and most compact option, perfect when floor space is at an absolute premium.
For components, base cabinets typically run 24 inches deep (standard sizing), while upper cabinets at 12 inches deep save precious space without sacrificing much storage. Countertop materials range from warm, forgiving butcher block to practical laminate to luxurious quartz—each at a different price point and maintenance level. Your sink will likely be an undermount or drop-in style, ranging from 15 to 25 inches wide depending on what you can fit and what your cooking habits demand.
Appliance sizing is where tiny home living gets creative. A compact refrigerator in the 10-to-18 cubic foot range (or a 12-volt RV fridge for off-grid builds) handles food storage beautifully. Your range will typically be 20 to 24 inches wide, or you might opt for portable burners that offer flexibility. An 18-inch or drawer-style dishwasher is a luxury that many tiny home owners find surprisingly worth the space. And a microwave—mounted over the range to save counter space, or sitting on the counter if that’s simpler—rounds out the essentials.
Bathroom Installation
Designing a tiny home bathroom is an exercise in creative space management. Let’s start with the fixture that generates the most debate: the toilet. A composting toilet is the off-grid darling, requiring no plumbing connections whatsoever, though the $900 to $2,000 price tag and the learning curve of managing the composting process give some people pause. RV cassette toilets are portable and manually emptied for $150 to $400, offering a simpler solution for mobile living. And a standard flush toilet, at $200 to $500, gives you the familiar experience you’re used to but requires full plumbing connections.
For your shower, a prefab unit in 32x32-inch or 36x36-inch dimensions offers the easiest installation path and reliable waterproofing. Custom tile showers are undeniably beautiful and let you personalize every detail, but they benefit strongly from professional installation to ensure lasting waterproofing. The wet bath approach—RV-style, where the toilet sits inside the shower area—is the ultimate space saver, sacrificing some convenience for precious square footage.
Your sink choice comes down to space priorities. A pedestal sink offers compact, classic styling. A vanity provides that valuable storage underneath. And a wall-mounted sink is the most space-efficient option of all, freeing up the entire floor area below for storage bins or simply making the bathroom feel less cramped.
Phase 7: Final Touches (Weeks 23-24)
Trim and Molding
Trim work is the punctuation of your tiny home—it’s what makes the whole thing read as “finished” rather than “almost done.” Baseboards cover the inevitable gap where flooring meets wall (and trust me, there’s always a gap). Crown molding is entirely optional, but if your ceiling height allows it, even a small profile adds a surprisingly polished look. Window and door casing frames your openings and hides the rough edges of your installation. And stair trim, if you have a loft ladder or staircase, adds both safety and visual appeal.
Paint and Stain
Your color strategy matters more in a tiny home than in any other type of dwelling, because every surface is within arm’s reach and always visible. Light colors are your best friend for expanding the sense of space—whites, light grays, and soft pastels make walls feel like they’re receding. A single accent wall in a deeper tone adds visual depth and personality without closing in the space. Keep your ceiling the same shade as your walls or lighter—never darker, unless you’re deliberately going for a cozy, cocoon-like feel. And your trim color should contrast with your walls just enough to create definition and structure.
Fixtures and Hardware
This is the moment where your tiny home finally becomes truly livable. Install all your light fixtures—and take your time with placement, because good lighting transforms a small space from cramped to cozy. Put cover plates on every outlet and switch (you’d be amazed how many builders skip this “later” and then live with exposed junction boxes for months). Install your cabinet hardware—those knobs and pulls you agonized over choosing will make your kitchen and bath feel complete. Add your bathroom accessories like towel bars and the toilet paper holder. And hang your window treatments, whether curtains or shades, which add both privacy and the final layer of “someone lives here.”
Systems Testing
Before you pop the champagne and declare your tiny home complete, it’s time for a methodical systems test. Every electrical circuit needs to be verified as working properly. Every plumbing connection needs to be confirmed as leak-free (run water for a solid 30 minutes and check every joint). Your HVAC system should be operational and maintaining temperature. All windows and doors need to seal properly without sticking or gaps. Every appliance should be functioning as expected. And this is non-negotiable: make sure your smoke and carbon monoxide detectors are installed, tested, and have fresh batteries.
Do a deliberate walk-through with fresh eyes—pretend you’ve never seen this house before. Open and close every window and door, listening and feeling for problems. Turn on every faucet and run the drains. Test all your GFCI and AFCI protection by pressing the test buttons. Run your HVAC for a full hour and confirm stable, consistent behavior. Take your first real shower and then look carefully for any water staining in unexpected places. Tiny problems are easiest to fix right now, before your furniture is in and your tools are packed away.
Post-Construction
Inspection and Certification
If your tiny home is mobile and you plan to transport it across state lines, RVIA (Recreational Vehicle Industry Association) certification may be required. It’s mandated in some states, ensures road safety compliance, costs approximately $2,000 to $4,000, and involves a thorough third-party inspection of your entire build. It’s not cheap, but in states that require it, there’s no workaround.
For permanent foundation tiny homes, local building inspections follow a more traditional path. You’ll need inspections at each major phase—framing, electrical, plumbing, structural—culminating in a final Certificate of Occupancy (CO) that legally allows you to live in your new home. Schedule these inspections proactively, because inspection department backlogs can add weeks to your timeline if you’re not ahead of them.
Transportation (If Mobile)
When it’s finally time to move your tiny home to its permanent (or semi-permanent) location, you have two options. Hiring a professional mover typically costs $3 to $5 per mile, requires proper insurance coverage, and involves weight limit verification—but it comes with the peace of mind that someone who does this for a living is handling the trickiest part of the journey. Get multiple quotes, because prices vary significantly.
If you’re towing it yourself, you’ll need a proper tow vehicle (3/4-ton truck minimum for most tiny homes), a weight distribution hitch, a trailer brake controller, and the wisdom to practice in an empty parking lot before hitting the highway. Towing a tiny home is nothing like towing a boat or a small utility trailer. The weight is higher, the wind profile is larger, and the consequences of a mistake are much more significant. Take it slow, plan your route carefully, and don’t be too proud to hire a pro if the distance or terrain makes you nervous.
Tool List
Essential Tools ($500-1,000)
Every tiny home build starts with a core set of tools that you’ll reach for hundreds of times. For power tools, you’ll need a circular saw for breaking down sheet goods and making rough cuts, a drill/driver combo (buy the best you can afford—you’ll use it more than any other tool), a jigsaw for curves and cutouts, a miter saw or miter box for clean angle cuts on trim and framing, and an orbital sander for finish work.
Your hand tool collection should include a quality hammer, levels in both 24-inch and 48-inch lengths, framing and speed squares for layout work, a 25-foot tape measure, a sharp utility knife, a pry bar for those inevitable “oops” moments, a full set of screwdrivers, pliers in several sizes, and wire strippers for electrical work.
And please, take safety seriously from day one. Stock up on safety glasses (keep multiple pairs because you’ll lose them), ear protection for all that power tool noise, a proper dust mask or respirator (not a paper mask—a real one with replaceable filters), sturdy work gloves, and a well-stocked first aid kit. Construction injuries are common even among professionals, and being miles from help in a half-built house is not the time to discover you don’t have bandages.
Advanced Tools (Nice to Have)
Once your budget and build demands justify it, a few additional tools can dramatically speed up your work. A table saw transforms sheet goods and lumber processing from tedious to efficient. A nail gun—both framing and finish sizes—with an air compressor can cut your framing time in half. An impact driver handles heavy-duty fastening effortlessly alongside your drill/driver. An oscillating multi-tool is the Swiss Army knife of renovation work, perfect for flush cuts, detail sanding, and getting into tight spaces. And a router opens up a world of custom edges and joinery for your finish work.
Next Steps
- Review Legal Requirements and Codes
- Learn about Sustainable Systems
- Explore Interior Design Ideas
- Calculate your budget with our Budget Calculator
Building a tiny home is a marathon, not a sprint. Take your time, do it right, and don’t be afraid to ask for help or hire professionals for the tasks that exceed your skill level. The result will be a home you’re genuinely proud of—one you built with your own hands, designed to fit your life, and filled with the satisfying knowledge that you know exactly what’s behind every wall.
If you want a final piece of advice that experienced builders repeat like a mantra: finish the exterior fully before you get emotionally attached to the interior. A dry, sealed shell protects everything you do next. Once the weather can’t hurt you, the build becomes dramatically more enjoyable—and you can take your sweet time making the inside exactly right.